Wednesday, August 31, 2011

Challenges Entry: Baby Dear Card

We're having a bit of a department baby boom at work.  Two baby girls (or so they say...I don't trust it until the kid is born!) are due in November and December.  I created this "Baby Dear" card with them in mind and for two challenges:

The Details:
  • The carriage and text background is a copy of an original Sears & Robuck catalog page that I recently purchased from Lynn Steven's Trash to Treasure Art Etsy shop.  I copied it onto light pink card stock and scalloped and distressed the edges.

  • "Baby Dear" is stamped on K&Co tag.  I wanted lots of layers on this card and I like how the tag added texture and color, but also gave me a relatively blank area to stamp my sentiment on.
     

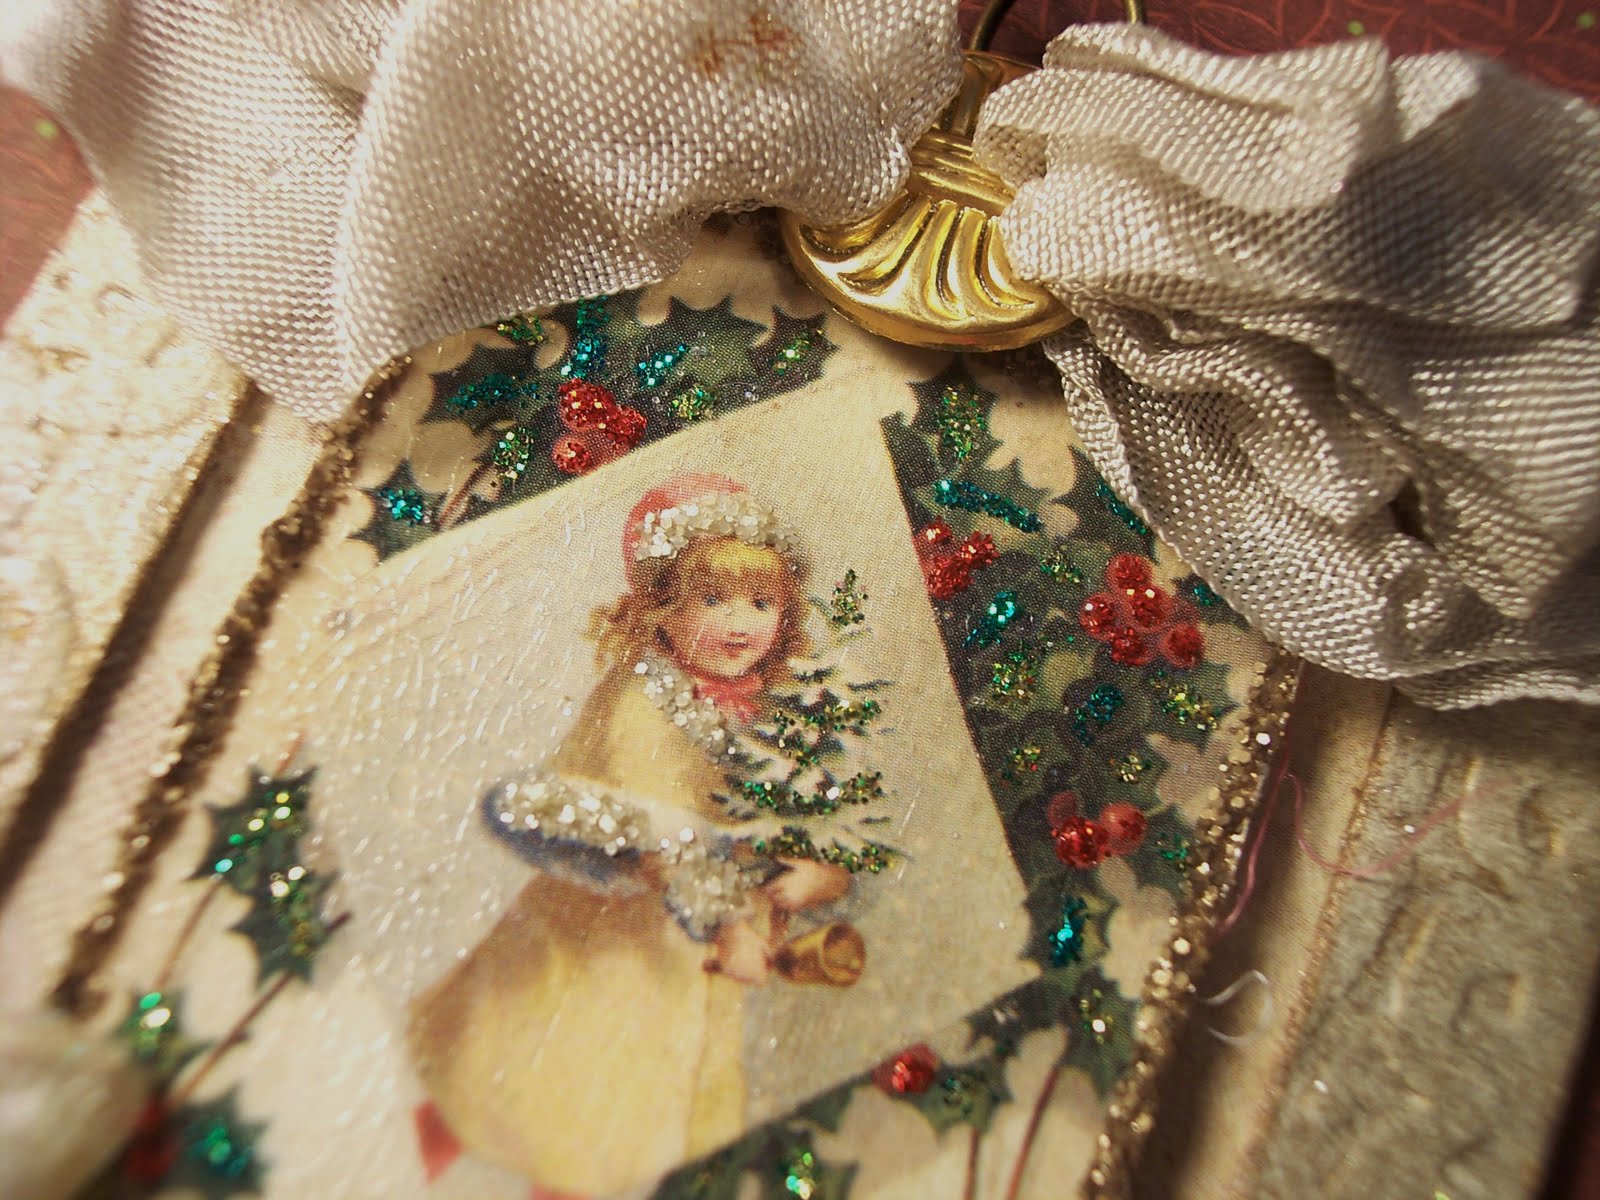
  • The baby image is from Crafty Chick's Retro Fantasy.  I used the Glossy Accents and Distress Crackle Paint combination again on the baby image (check out my "Hit the Road" card for another example of this technique).  Added Old Paper Distress Stickles around the outside to give it a more finished edge treatment. 

  • The baby image is adhered via foam tape to a chipboard label plate that was colored with Victorian Velvet Distress Stain.  Don't Distress Stains make it SO much easier and faster to color chipboard?!  Love them!
  • The final details were the hand-dyed seam binding bow, corsage pin with glass beads, and pearl accents below the sentiment.

I really love the soft, vintage feel of this card.  I can almost smell the baby powder when I look at it!  :-)


Supplies:
Paper
:  SU! cardstock ‘Naturals Ivory’; PTI cardstock ‘Sweet Blush’; K&Co Studio 112 ‘McKenna Tags’
Image: Crafty Chick’s Retro Fantasy ‘art_digital_vintage_baby_card_3_true_love’
Stamps: unknown (borrowed)
Inks: DI ‘Old Paper’, ‘Vintage Photo’, ‘Tattered Rose’; Distress Stains ‘Victorian Velvet’; Perfect Pearls Mist ‘Heirloom Gold’; Alcohol Ink ‘Sandal’, ‘Mushroom’; StazOn ‘Jet Black’
Embellishments: pearls; Distress Stickles ‘Old Paper’; Glossy Accents; Distress Crackle Paint ‘Rock Candy’; Darice corsage pin; glass beads; Hug Snug seam binding ‘Ivory’; chipboard label plate
Tools: foam ink blending tool; felt ink blending tool; foam tape; scallop scissors; heat gun; ink jet printer

Monday, August 29, 2011

Challenges Entry: Hit the Road Card

Honoring teens and travel with today's card.  I had my 15-year-old nephew in mind for this card...he'll be getting his driver's license next May.  I know I'm quite early to be making this card, but it fit in well with a few challenges and I wanted to give everyone in mid-Michigan 9 months warning that he'll be hitting the road!  :-)

The Details:
  • I layered up lots of neutrals with black for a color scheme that I think complements the black and white car illustration from Digital Two for Tuesday.
  • The neutral inset cardstock is embossed with a Cuttlebug folder to mimic stamped metal.
  • One of my favorite details on this card is the faux enamel number charm.  To create, I punched a circle from SU! Confetti White cardstock, then added the number stickers and antiqued with Old Paper DI.  I then added a black eyelet and covered the whole tag in Glossy Accents.  Once the Glossy Accents was dry, I lightly brushed on some Rock Candy Distress Crackle Paint.  This combination creates an interesting crackle finish and has an enamel appearance.  

The Challenges:


Supplies:
Paper: PTI cardstock ‘Kraft’; SU! cardstock ‘Sahara Sand’, ‘Basic Black’, ‘Confetti White’; SU! vellum; scrap pattern paper
Image: Digital Two for Tuesday
Inks: DI ‘Old Paper’; Sharpie pen ‘black’
Embellishments: number stickers; photo corners; ribbon; PTI rustic button twine; Cuttlebug embossing folder; SU! eyelet ‘Black’; Glossy Accents; Distress Crackle Paint ‘Rock Candy’; TH jump ring
Tools: vellum tape; Texture Boutique; foam ink blending tool; circle punch; eyelet setting tools

Sunday, August 28, 2011

Challenges Entry: Top of the Class Card

I've been having a lot of fun lately with The Creative Pointe's new SVG file set called "School Set".  Cindy's put together a great collection of back-to-school images that you can purchase from either Cut and Create or TKO Scraps


One thing that I want to point out on the "School Set" images above...
Because this is an SVG file set and not a cutter cartrige, well, number one, it's a heck of a lot CHEAPER!!  But, my real point is that you can actually use just the pencil or just the "Back to School" wording, or use them together as shown.  Also, if you want a long, thin pencil, you can do that too!  SVG (scalable vector graphic) files are just that versatile!

A Few Details:
  • On my Top of the Class card, I've again combined my "School Girl" digital stamp with a cut image (using the CP School Set, Sure-Cuts-A-Lot and my Cricut).  This time, I've stood her on a stack of school books.  I love that the spines have been left open so that you can write your own subjects or sentiment, like I did here. 
  • I embossed the background with the Tim Holtz notebook texture fade, brought out the embossing with Vintage Photo Distress Ink, and distressed the edges even more with Aged Mahogany Distress Stain. 
  •  A strip of primitive alphabet pattern paper (a new sheet!...I cut into a new sheet!), some Papertrey Ink button twine, and of course, a button, finish things off. 

The Challenges:

Supplies:
Paper
: SU! cardstock ‘Ruby Red’, ‘Basic Black’; Be Inspired; Daisy D’s; PTI cardstock ‘Kraft’
Image: ‘School Girl’ digital stamp by Paper Squirrel
SVG: ‘School Set’ by The Creative Pointe
Inks: DI ‘Vintage Photo’, ‘Old Paper’; Distress Stain ‘Aged Mahogany’; Martha Stewart craft markers; Le Pen ‘Brown’; Glaze Pen ‘White’
Embellishments: PTI rustic button twine; button; TH Texture Fade ‘Notebook’

Tools: scallop scissors; 3M foam tape;  glue dots; Texture Boutique; SCAL; Cricut Expression; ink jet printer; foam ink blending tool

Friday, August 26, 2011

Free Digi Friday: Sunflower Basket Fill

Loving all the creative time I've had the past week, and very sad that soon I will have to return to the real world...and my real job.  But, I am surely grateful that I am gainfully employed and can support myself, the boy cats, and my craft addition!

Today's free digital stamp is this "Sunflower Basket Fill".  This digi is specifically designed to coordinate with The Creative Pointe's free "Basket" SVG file, so be sure to zip on over to Cindy's blog to nab this fab-o basket (which is super versatile on its own).  And no worries if you're not set-up to cut SVG files...she also has a printable basket file for you.

**EDITED**
Friday Free Digis are free for one week. This digital stamp is now available for purchase. To order, go to the side bar, enter the stamp name shown below and click 'buy now' to pay via Pay Pal.

Cost: $2.00
Stamp Name: Sunflower Basket Fill
I will email you the file within 24 hours of receiving payment.

I actually completed my example project in time to post with the digi this week!  (Did I mention that I love being on vacay?...oh, that's right, I did...)  I was also organized enough to plan this card for a few challenges out there in blogland.  I'll be this organized again when I'm next on vacation!  :-)

The Challenges:


Supplies:
Paper
: SU! ‘So Saffron’, ‘Going Gray’, ‘Naturals Ivory’; PTI ‘Kraft’, ‘Dark Chocolate’; scrap pattern papers
Image: Sunflower Basket Fill digital stamp by Paper Squirrel
SVG:  Basket by The Creative Pointe
Stamps: Cloud 9 Simple Thoughts ‘Memories’
Inks: DI ‘Vintage Photo’, ‘Old Paper’, ‘Forest Moss’, ‘Wild Honey’; Distress Stains ‘Spiced Marmalade’, ‘Rusty Hinge’, ‘Brushed Corduroy’, ‘Crushed Olive’; Martha Stewart craft markers; Le Pen ‘Black’
Embellishments: Glossy Accents; crocheted lace ribbon; PTI rustic button twine

Tools: foam ink blending tool; foam tape; TH paper distresser; Sure-Cuts-A-Lot; Cricut Expression; ink jet printer

Thursday, August 25, 2011

Challenge Entry: Sweet Friend Card

Gingersnap Creations is celebrating the joys of childhood this month.  For GC113: Chestnut Theme Challenge - Babes & Tots, I pulled out a fun vintage image that I'd saved eons ago (and of course did not note where I got it from...sorry!).  These three adorable little girls are actually the models on a French sewing pattern.

A Few Details:
  • I printed the image on plain white office cardstock, colored with markers, and aged it with the Tim Holtz paper distresser and some Vintage Photo Distress Ink.
  • I added faux stitching with a brown Le Pen.  "Sweet Friend" is stamped on vellum with brown StazOn ink, cut out with deckle scissors, and aged with more Vintage Photo DI.


Supplies:
Paper
: SU! cardstock ‘Creamy Caramel’; SU! vellum; DCWV; scrap pattern paper
Image: unknown
Stamps: unknown
Inks: Distress Ink ‘Vintage Photo’, ‘Old Paper’; Martha Stewart craft markers; Le Pen ‘Brown’; StazOn ‘Timber Brown’
Embellishments: crochet lace ribbon; satin ribbon

Tools: vellum tape; Tim Holtz paper distresser; foam ink blending tool; deckle scissors; scallop scissors; ruler; foam tape; Scotch cutter

Tuesday, August 23, 2011

Class Act Card

Combined efforts with The Creative Pointe to create this "Class Act" card featuring Friday's School Girl digital stamp.  I love how perfectly is Cindy's School House complements our little school girl!  You can pick up this SVG file for FREE at The Creative Pointe.

The Details:
  • The School House SVG was cut from scraps of red, black, and yellow papers/cardstock.  Instead of using the base layer, I added crinkled Tim Holtz kraft glassine behind the windows and door opening.  I like the vintage-y look this gives it.  I then outlined the bell, doors, and windows in black pen and added shading with distress inks/stains and an aqua pen.
  • The School Girl digital stamp was printed on kraft cardstock and sunflower print patterned paper.  I love paper piecing dresses on my digital stamps...so much easier and prettier than trying to create that pattern through coloring!  I added color and shading/highlight with marker, distress inks/stains, and an aqua pen.  She's attached to the card with foam tape for extra dimension between her and the school house.
  • The path was cut from a scrap of kraft cardstock using deckle edge scissors, then shaded with Vintage Photo DI.
  • The notebook paper and tape section was cut from a K&Co Trinket tag and shaded with Old Paper DI.  I hand lettered "You're A Class Act!" in brown Le Pen.

Supplies:
Paper
: Stampin’ Up! cardstock ‘So Saffron’, ‘Basic Black’; Papertrey Ink cardstock ‘Kraft’; scrap patterned papers; Tim Holtz Kraft Glassine; K&Co Studio 112 ‘Trinket Tags’
Image: ‘School Girl’ digital stamp by Paper Squirrel
SVG: ‘School House’ by The Creative Pointe
Inks: Distress Ink ‘Vintage Photo’, ‘Old Paper’, ‘Wild Honey’; Distress Stains ‘Victorian Velvet’, ‘Barn Door’, ‘Picket Fence’, ‘Aged Mahogany’, ‘Spiced Marmalade’, ‘Brushed Corduroy’; Le Pen ‘Black’, ‘Brown’
Embellishments: buttons; PTI rustic button twine

Tools: foam tape; glue dots; scallop scissors; Sure-Cuts-A-Lot; Cricut Expression; inkjet printer

Monday, August 22, 2011

Such a Tease!

The weather on "craftcation" has been too cool for beach time, so we've been in full creative mode the last couple of days.  Lots of cards to share with you in the coming week(s), but tonight, I'm just going to tease you with a little sneak peek!

The card on top was yesterday's post...so much fall goodness hiding underneath!  School Days, Halloween, and Thanksgiving...oh my!  Those papers sticking out are my supply lists...I was afraid to take them out for fear of mismatching, but I figured you wouldn't mind.

While I've had to transplant nearly my entire studio for a week, I do have the benefit of good company (my mom, sister, and Millie the bulldog) and Cindy's entire stash at my disposal.  But just like at home, my work area is a complete disaster!


Hope you enjoyed the peek...stay tuned!  :-)

Sunday, August 21, 2011

Challenge Entry: Skeleton Card

Well, dear followers, you will be seeing a lot from me in the coming week because I am now officially on "craftcation"!  One week of fun, sun, beach/lake (weather permitting), and creating!  Ahhh...life is good.  You may even see some collaborative projects between The Creative Pointe and me...hmm, what will we get ourselves into?  :-)

Today, I'm sharing a card I made last night for Gingersnap Creations' GC112: Color Challenge - Leather, Iron and Brass.  All the stamps on this card are from Stamper's Anonymous Tim Holtz "Mini Halloween".  Don't you just love playing with other people's stashes?  Although, it is seriously dangerous to the budget, because now, I really want this Tim Holtz stamp set for myself.

The Details:
  • The card is PTI kraft card stock with the spider web stamped in Old Paper DI and the bats in Tea Stain DI.
  • I covered a chipboard ticket in cream cardstock, then clear embossed the skeleton.  Once cool, I colored the ticket with Brushed Corduroy Distress Stain.  (Yes, I FINALLY purchased Distress Stains and am in love!)  I spattered some water on the ticket and dried it with a heat gun to give it a water damaged appearance.  The finishing touch was some faux stitching in black.
  • I recently purchased the 7 Gypsies border punch kit from Crafty Steals.  What a value!  You get 6 different exchangeable border punches.  I used it here to run ribbon through.
7 Gypsies Border Punch Kit

I'm working on a series of Halloween cards using this Mind's Eye paper collection and TH stamps, so look for those coming soon!

    Supplies:
    Paper
    : My Mind’s Eye ‘The Spider’s Web’; Papertrey Ink cardstock ‘Kraft’; Bo-Bunny Press ‘Dem Bones’; Stampin’ Up! Cardstock ‘Naturals Ivory’
    Stamps: Stamper’s Anonymous Tim Holtz ‘Mini Halloween’
    Inks: Distress Ink ‘Old Paper’, ‘Tea Dye’; StazOn ‘Jet Black’; Versamark; Distress Stain ‘Brushed Corduroy’; Le Pen ‘Black’
    Embellishments: SU! black & white gingham ribbon; PTI rustic button twine; button; chipboard ticket; clear embossing ticket
    Tools: heat gun; 3M Super 77 spray adhesive; 3M foam tape; foam ink blending tool; glue dot; TH paper distresser; scallop decorative scissors; pinking decorative scissors; 7 Gypsies border punch kit; embossing powder tray

    Saturday, August 20, 2011

    My Favorite Things

    My top 10 favorite crafty things:
    1. 3M Scotch foam tape...accept no substitutions, it has to be 3M for me!
    2. Black & white gingham ribbon...this is my go-to ribbon
    3. Papertrey Ink Kraft cardstock...I am in love with using this as a card base, it just makes everything on top of it look cool
    4. Old Paper Distress Ink and Distress Stickles...if it's Old Paper, I love it!
    5. Buttons...seems like no project is complete without some buttons
    6. Flowers...the perfect fill-in, kind of like buttons...
    7. Tim Holtz Paper Distresser...where have you been all my life?  Sure beats tearing and/or licking the paper to get that perfectly distressed edge
    8. Papertrey Ink Rustic Button Twine...simply the best twine around!
    9. Tweezers...for holding tiny things, for pulling ribbon through the hole, for holding things while using a heat gun...the uses are endless
    10. My laptop...for access to fantastic images, printing greetings / captions, blogging, using Sure-Cuts-A-Lot, etc.  How did I ever craft without it?

    I'm sure I've left something out, but these are what immediately came to mind and are the things I reach for over and over again.

    What are some of your favorite crafty things?  We'll all benefit from knowing (and maybe they'll become our favorites, too)!

    Friday, August 19, 2011

    Free Digi Friday: School Girl

    Oh, dear followers, it's hard to even post this because while I love autumn, it inevidently leads to winter and winters in Michigan are long and cold.  But alas, our summer will be over before we know it (sniff), so in preparation (and because I know many of you are already back to school), today's free digi is this School Girl. 

    **EDITED**
    Friday Free Digis are free for one week. This digital stamp is now available for purchase. To order, go to the side bar, enter the stamp name shown below and click 'buy now' to pay via Pay Pal.

    Cost: $2.00
    Stamp Name: School Girl
    I will email you the file within 24 hours of receiving payment.

    Doesn't she look so excited with her new dress and shoes and backpack, clutching her brown bag lunch, ready to get on that big yellow school bus? 

    Check back to see what I come up with for our little School Girl...I'll be posting a project featuring her some time this week.

    Wednesday, August 17, 2011

    A Banana Split For You Gift Tag

    With this week's free Banana Split digital stamp, I made a gift bag tag.  These are always handy to have pre-made for those last minute gift wrap sessions...oh, is that just me?  :-)

    The tag measures about 4" wide and is just three layers of ovals cut with my Coluzzle.  I obviously need to replace my cutting blade, but I kind of liked the rough edge effect, so I left it.

    By draping the ribbon around the handles, you decorate the bag without altering the bag, so it can be reused and redecorated again and again.  Adjust the size of your tag and/or ribbon length to fit larger bags.  This would also be a great gift tag template for wine or liquor bottles.

    Tip:  When coloring digital stamps printed with an inkjet printer, first spray the image with Krylon Workable Fixatif to set the ink.  This prevents your ink from bleeding into your markers or watercolors.  Just make sure to work in a well ventilated area!


    Supplies:
    Paper
    : SU! cardstock ‘Not Quite Navy’, ‘Naturals Ivory’; Paper Pizzazz ‘Green Party Words’
    Image: ‘Banana Split’ digital stamp by Paper Squirrel
    Stamps: SU! ‘All Year Cheer III’
    Inks: StazOn ‘Jet Black’; Martha Stewart craft markers
    Embellishments: Stickles ‘Fruit Punch’, ‘Icicle’, ‘Crystal’; ribbon

    Tools: Coluzzle; hole punch; Krylon Workable Fixatif; ink jet printer

    Monday, August 15, 2011

    The Witching Hour

    I had an epiphany the other day on a new way to use the Fancy Flourishes Two SVG set from The Creative Pointe.  I love when I get inspired and I'm not even crafting!  But I'm always bummed if I don't have a pen and paper with me to jot down the idea, because those don't always stick.  Luckily, this time I was able to jot down a sketch.


    The Details:
    • The Scroll Hanger - it took a few steps to give it an antique bronze appearance...
      • The scroll hanger is part of the Fancy Flourishes Two SVG file set.  I cut the scroll three times from cereal box cardboard and glued all the layers together, making sure that the plain Kraft side was facing out. 
      • I then applied black antiquing gel to the front and back using a make-up sponge.  I pounced the gel on with varying thickness, but made sure to have good coverage overall and also made sure to get all the edges.
      • At this point, I punched my attachment holes in my scroll.
      • Once the antiquing gel was dry, I applied several layers of Ultra Thick Embossing Enamel (UTEE) to the front and back. 
        • Be careful when applying UTEE to both sides of something...you'll basically end up with one good side and one okay side because when applying the heat to one side, the UTEE on both sides heats up.  I found it was best to get the front the way I wanted it, then apply one layer to the back, heating it carefully while holding it up and away from my surface (with tweezers).  This keeps the front as cool as possible while you heat the back.
      • After the UTEE cooled, I pounced on Sandal Alcohol Ink to antique the color and to create a matte finish (AIs take away the glossy finish on UTEE). 
      • I then sprayed the front of the scroll with Heirloom Gold Perfect Pearls Mist and reheated the UTEE just enough for the mist to be absorbed into the UTEE. 

    • The Placard
      • The base was created by layering decorative paper onto heavy cardboard, then embossing both using Tim Holtz's Collage Texture Fade.
      • The paper was originally a pretty bright yellow-orange, but I antiqued it using the black antiquing gel.
      • I then layered lace and gingham ribbon onto the base.
      • The "Spooky Old Woman" image is from The Graphics Fairy.
      • Her witch hat is hand cut from grunge paper, colored with black antiquing gel, highlighted with gold and white pens, and finally antiqued with Vintage Photo DI and Walnut Stain Distress Stickles.  The band is a piece of decorative paper.
      • I printed the "Beware the Witching Hour" on a piece of cardstock, sketched a scroll around it, cut it out, distressed the edges, and added Old Paper, Vintage Photo, and Crushed Olive DI.   It's only glued to the placard at either end allowing the banner to bow out a bit for some dimension.
      • The clock is actually a button that I got on clearance at JoAnn.  I distressed the face with a touch of Sandal Alcohol ink. 
      • The gingham ribbons are distressed using Crushed Olive, Vintage Photo, and a mist of Heirloom Gold Perfect Pearls Mist.
      • The placard is attached to the scroll hanger using two sizes of TH jump rings and Making Memories trinket pins (these are fab-o and can be found at Archiver's).

    Linking back to Brag Monday at The Graphics Fairy...


    Supplies:
    Paper
    : SU! cardstock ‘Naturals Cream’; TH grunge paper; scrap background paper
    Image: Graphics Fairy ‘pa-womancabinetcard-graphicsfairy012sm’
    SVG:  The Creative Point ‘Fancy Flourishes Two’
    Inks: DI ‘Vintage Photo’, ‘Crushed Olive’, ‘Old Paper’; Delta Black Antiquing Gel; Versamark; Alcohol Ink ‘Sandal’; Le Pen ‘Black’; Glaze pen ‘White’; Zig Writer ‘Metallic Gold’
    Embellishments: Perfect Pearls Mist ‘Heirloom Gold’; JHB clock button; Wright’s lace hem facing; TH texture fade ‘Collage’; Distress Stickles ‘Walnut Stain’; Ultra Thick Embossing Enamel ‘Clear’; TH jump rings; Making Memories trinket pins; ribbon; K&Co embossed frame

    Tools: foam ink blending tool; felt ink blending tool; SU! eyelet hole punch; heat gun; 3M foam tape; tweezers; Sure-Cuts-A-Lot (SCAL); Cricut Expression; ink jet printer; stylus; TH paper distresser; Texture Boutique; make-up sponge; Glossy Accents; embossing powder tray
    Misc: cereal box

    Sunday, August 14, 2011

    Wish U Well Card

    Sharing a get well card today that I made for a friend who will be having surgery next week.  She's not a "girly" person, but I did want to make her a bright and cheery card.  

    The Details:
    • I had the layout idea before I found the bright pink "U" chipboard piece which I toned down a bit with some Mushroom alcohol ink.
    • The "Wish" and "Well" are from two different stamp sets and I did have to ink carefully to get just the "Well".
    • For some sparkle and embellishment, I added dots of Orange Peel Stickles along the inside edge of the decorative paper and a circle clip with hunks of ribbon, fibers, and twine.
    Pretty quick and simple, but cheery!


    Supplies:
    Paper
    : Sixth Avenue; PTI cardstock ‘Kraft’; SU! cardstock ‘Bravo Burgundy’, ‘Pumpkin Pie’ (inside), ‘Confetti White’
    Stamps: SU! ‘Small Script’, ‘Cheery Chat’
    Inks: Alcohol Ink ‘Mushroom’, ‘Blending Solution’; StazOn ‘Timber Brown’
    Embellishments: spiral paper clip; ribbon; fibers; PTI rustic button twine; Stickles ‘Orange Peel’

    Tools: felt ink blending tool; foam tape

    Friday, August 12, 2011

    Free Digi Friday: Banana Split

    TGIF!  Hope everyone had a great week and has an even better weekend ahead!

    Continuing with the sweet treats theme this week with a Banana Split.  Here's a few possible sentiments for this image:
    • Sweet friend
    • I'm bananas for you!
    • You're sweet
    **EDITED**
    Friday Free Digis are free for one week. This digital stamp is now available for purchase. To order, go to the side bar, enter the stamp name shown below and click 'buy now' to pay via Pay Pal.

    Cost: $2.00
    Stamp Name: Banana Split
    I will email you the file within 24 hours of receiving payment.

    Have you created something with this or another one of my digis?  I'd love to see it!  Leave a comment with a link to your project and I'll be sure to stop by and leave a kind word.

    Wednesday, August 10, 2011

    Birthday Cake Card

    Sharing my example project using this week's Birthday Cake Wedge free digital stamp.  This card is bright and fun and features an easy technique to customize background paper to suit your project.

    A Couple of Details:
    • First, I started with the cake.  I printed the image on Lemon Tart cardstock and colored it using watercolor pencils and an aqua pen.  To add some dimension, I added Stickles to the candle and flame and Glossy Accents on the outlines of the cake...this was done fast, I didn't want it to be too fussy.
    • While checking my stash for some coordinating background paper, I found this geometric pattern that had all the colors, except for the yellow, which was key.  No problem!  I pulled out a simple circle stamp and some yellow paint and now my background paper has ALL the colors I needed.
    So next time you pull out that paper that is almost perfect...if it just had that other color...add it in paint!


    Supplies:
    Paper
    : Papertrey Ink cardstock ‘Lemon Tart’; Stampin’ Up! ‘Pretty in Pink’; DCWV
    Image: Birthday Cake Wedge digital stamp by Paper Squirrel
    Stamps: SU! ‘It’s Your Birthday’, ‘Smile’
    Inks: StazOn ‘Timber Brown’; Delta acrylic paint ‘Pale Yellow’
    Embellishments: Glossy Accents; Stickles ‘Icicle’, ‘Crystal’

    Tools: circle punch; ink jet printer; 3M foam tape; Fiskars corner rounder punch

    Monday, August 8, 2011

    Challenges Entry: Season of Joy Ornament

    Fast forwarding from yesterday's Halloween tag to another Christmas ornament.  I am loving the effect of embossed chipboard on this one and Crafty Secrets Heartwarming Vintage Cuts images (this one from "Christmas Time") are perfectly sized for ornaments.

    The Challenges:

    The Details:
    • The outside frame was plain chipboard until I embossed it using the Tim Holtz Patchwork Texture Fade.  I painted it with buttermilk and metallic antique gold acrylic paint and then distressed it with Vintage Photo Distress Ink. 
    • Glitter Technique:  After I was pleased with the color on the chipboard frame, I sprayed it with both Heirloom Gold and Perfect Pearl Perfect Pearls Mist and, while still wet from the mists, added a generous coating of fine crystal glitter.  I gently shook off the extra glitter and allowed it to dry.  To ensure good adhesion of the glitter, I sprayed the frame with an acrylic top coat.  The effect of adding the glitter right to the Perfect Pearls Mist is a tarnished, antique silver sparkle that is beautifully vintage!

    • For the central image, I added a layer of Rock Candy Distress Paint and once dry, added some Old Paper Distress Ink to highlight the crackle.  I then added several colors of regular and distress Stickles to highlight the image and form a border.

    • The seam binding bow started out as plain cream, but was distressed using Heirloom Gold Perfect Pearls Mist and just a touch of Vintage Photo DI in a few places to make it look authentically stained.  The brass ribbon charm is from A Charming Place.
    • I didn't want to put a hole in my pretty glittered frame, so instead, I secured a TH mini paperclip between the chipboard frame and the cardboard backing to create a charm ring. 
    • The charm and beads started out with silver metal findings, but with some Sandal alcohol ink, they now match the antique brass TH jump rings.


    Supplies:
    Paper
    : Hot Off the Press
    Image: Crafty Secrets Heartwarming Vintage Cuts ‘Christmas Time’
    Inks: Distress Ink ‘Old Paper’, ‘Vintage Photo’; Americana acrylic paint ‘Light Buttermilk’; Folk Art acrylic paint ‘Metallic Antique Gold’
    Embellishments: chipboard frame; TH texture fade ‘Patchwork’; Perfect Pearls Mist ‘Heirloom Gold’, ‘Perfect Pearl’; Martha Stewart glitter ‘Ultrafine Crystal’; TH Distress Paint ‘Rock Candy’; Alcohol Ink ‘Sandal’; Alcohol Ink Blending Solution; Blue Moon bead; TH mini paper clip; TH jump rings; assorted glass beads; Stickles ‘Xmas Red’, ‘Green’, ‘Lime Green’; Distress Stickles ‘Frayed Burlap’, ‘Old Paper’; gold cord; A Charming Place brass ribbon charm; Hug Snug seam binding; Christmas floral

    Tools: Glossy Accents; foam ink blending tool; stylus; tweezers; TH paper distresser; emery board; Texture Boutique; 3M foam tape; 3M Super 77 spray adhesive; Krylon Clear; eyelet hole punch, glitter tray
    Misc: cardboard