Showing posts with label The Creative Pointe Creative Team. Show all posts

Monday, April 16, 2012

Congrats, Graduate!

Graduation season will soon be upon us and we're giving you lots of inspiration and card ideas for the new graduates over at Card A Day Blog.


Just a Couple Details:

  • I colored a chipboard label with Black Soot Distress Ink and a foam ink blender.  "Congrats" was stamped in Jet Black StazOn onto white cardstock, adhered to the center of the chipboard label and accented with a layer of Glossy Accents.
  • The mortarboard an SVG file from The Creative Pointe.  I cut it from black cardstock, then accented it with white Glaze pen.
  • I really love all the decorative tapes out there!  This one is K&Co.'s "Smash" tape.


Supplies:
Cardstock: Papertrey Ink ‘Spring Moss’
Patterned Paper:  Fancy Pants ‘Beach Bum’
SVG:  The Creative Pointe
Stamps: Inkadinkado
Inks: Distress Ink ‘Black Soot’; StazOn ‘Jet Black’; Glaze Pen ‘White’
Embellishments: K&Co. Smash tape; Stampin’ Up! brads; chipboard label; Glossy Accents
Tools:  Tim Holtz paper distresser; eyelet setting tools; foam tape; Cricut Expression; Sure-Cuts-A-Lot

Saturday, December 24, 2011

Merry Ornaments

T’was the night before Christmas and all through the craft room, a Cricut was stirring…

I created this last card for our entire department to sign and give to our boss along with her group gift.  It’s approximately 5x7, larger than my standard card size so that 20+ people could share their Christmas greetings on the inside.


Some Details:
·         I made my own background using Tim Holtz’s "Holiday Print" texture fade and highlighting it with Distress Inks.  Since texture fades are designed more for 4-1/4 x 5-1/2” cards, I added strips of patterned paper at the top and bottom to help fill the space.  I scalloped the edges and punched some “eyelet” using a small hole punch.
·         The ornaments were cut on my Cricut using Sure-Cuts-A-Lot and The Creative Pointe’s “Joy Ornament” SVG file.  The big ornament is approx. 3” tall.  To give it some extra dimension, I cut three layers…one from red patterned paper and two from red cardstock.  I stacked and glued these together, then add the green cardstock with “merry & bright” to the back.  

·      The large ornament was covered in a layer of Rock Candy Distress Stickles for some sparkle.  It also has an outline of Fired Brick D.S. around the oval cut out, Old Paper D.S. on the ornament cap, and the red area was covered in Glossy Accents after the Rock Candy D.S. had dried.

·         The smaller ornaments are the same ornament outline, but I removed the inner oval cut and scaled the SVG (scalable vector graphic) file to make one long skinny ornament and one short fat ornament.  These are cut from scraps, covered in Rock Candy D.S. and “hang” from gold cord.

Challenges:

Tuesday, October 18, 2011

Autumn Blessings Pumpkin Sign

In addition to the larger Pumpkin Welcome Sign, I also created a couple of smaller Autumn Blessings Pumpkin Signs...one as a hostess gift and one as an auction donation.  These went together very quickly and are easy to do as multiples since the finished size is about 5-1/2" wide and two can be cut on one 12 x 12 mat at the same time.  Could make a great hostess gift for Thanksgiving!


For the most part, the steps were the same as for making the Pumpkin Welcome Sign from Sunday's post, but instead of the "Welcome" letters, I cut a tag and border using Sure-Cuts-A-Lot and stamped "Autumn Blessings" in Coffee Archival Ink.

I again used just the background portion of Cindy's free leaf SVG.  You can get it for free at The Creative Pointe.

Remember, The Creative Pointe's super cute "Fall Set" can be purchased from Cut and Create.

Sunday, October 16, 2011

Pumpkin Welcome Sign

As soon as I saw The Creative Pointe's "Fall Set", I knew exactly what I wanted to do with that pumpkin SVG!  I gave this welcome sign to a friend for her birthday along with a yummy pumpkin-scented candle.  It turned out so cute, that I wish I would have made one for myself!


The Details:
  • The Creative Pointe's super cute "Fall Set" can be purchased from Cut and Create.
  • I scaled the pumpkin SVG to approx. 10" wide and cut the solid back piece from patterned paper and the sections outline piece from solid card stock.
  • Once those were cut, I scaled the solid back piece down just a touch and cut two more pieces from scrap cardboard, making sure that the back of the pumpkin would be plain cardboard and not the cereal label!  Layered up, this gives the pumpkin a good thickness for its size.  Scaling the cardboard down just that little bit makes it a lot easier to make sure that everything lines up nice and neat and you don't have any extra cardboard showing on the front.  (When I say "just a touch"...for example, if my front piece is 10.00", I would cut my back pieces at 9.80"...just a bit smaller.)
  • The sections outline was covered in a layer of Rock Candy Distress Crackle Paint and sprinkled with two colors of glitter while the paint was still wet.
  • Distress Stains and Inks were used to create shadows and highlights.
  • I used Sure-Cuts-A-Lot to cut the "Welcome" text from green patterned paper, adhered it to the pumpkin, and covered it in a layer of Glossy Accents.

  • The large paper leaf is one that Cindy offers as a free SVG at The Creative Pointe.  I used just the background portion here.

  • Some Stampin' Up! metal pieces glued on with Glossy Accents and strung with twine form the hanging apparatus.

  • To protect the decorative surface, I gave the finished piece a couple coats of Krylon Crystal Clear.


Challenges:
Fresh Brewed Designs - #67 Pumpkins

Tuesday, October 4, 2011

Slow-Mo Scrapper, That's Me!

Ask my family or any of my other scrapbooking buddies and they will tell you, I am an extremely SLOW scrapper!  I just love the details and can sometimes get caught up in them.  Last weekend's crop was not quite 1-1/2 days long and I finished 2 cards, 4 pages, and started 2 more pages, so I was on FIRE!  :-) 

Page #1 - my Mom's Birthday 2010

Pages #3 & 4 - My Nephew's High School Graduation 2010


I used the Cricut a lot this weekend for letters, but also used it on this page with one of The Creative Pointe's SVG files to create the header.  I did alter the SVG (yes, you can do that with Sure-Cuts-A-Lot!) to remove the 2011 date since my nephew graduated in 2010.  You can purchase this and all of Cindy's great SVGs from either Cut and Create or TKO Scraps
Here's what the original file looks like:

Page #4 - Grandpa's Ring
The story of my Grandfather's signet ring and how it is now being passed down through the generations.

I'll share the cards I made in another post.  Hope you enjoyed this peek at my scrap album.

Thursday, September 22, 2011

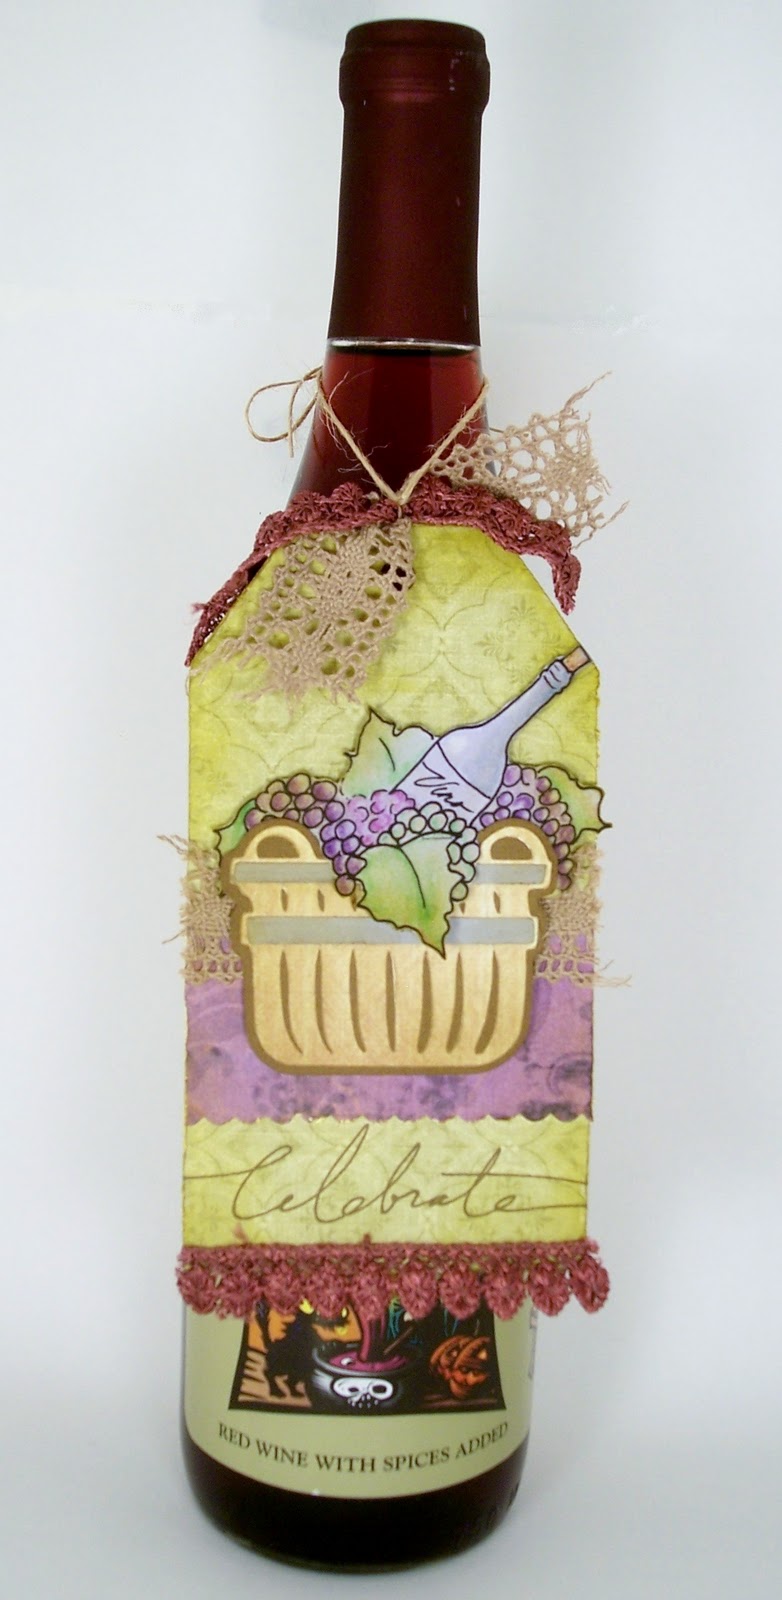
Vino Basket Tag

I hope you liked the basket fill digis from the past few weeks.  I used this week's "Vino Basket Fill" to create a fancy gift tag for...well, what else...a bottle of wine!  I left the back of the tag plain and clean so that I can address it with to/from and maybe a brief message to the recipient. 

A Few Details:
  • The basket SVG and tag were cut using Sure-Cuts-A-Lot and my Cricut.  SCAL comes with a lot of basic shape files and this tag was one of them.  I love that I can scale everything to suit my exact wants and needs (how often do you get to say that in life?!).  The tag measures approx. 3" wide x 5.5" tall.
  • If you haven't downloaded the basket yet, the SVG and print-and-cut files are still available at The Creative Pointe.
  • I printed the Vino Basket Fill digi on Stampin' Up! Almost Amethyst cardstock and sprayed it with a light layer of Krylon Workable Fixatif to set the ink.  I then used SU! watercolor pencils and an aqua pen to color the image.

  • Since I only left myself *just* enough room at the bottom of the tag for "Celebrate", I used my handy-dandy Stamp-a-ma-jig to position the word perfectly.  Do you have a Stamp-a-ma-jig?  I don't use it all the time, but when you really need to stamp it right the first time, it's the best!

And here's what it looks like dressing up that bottle of vino:

Tomorrow brings a new digi, so don't forget to snag the "Vino Basket Fill" digi while it's still free!

Challenges:

Supplies:
Paper
: SU! cardstock ‘Almost Amethyst’, ‘Going Grey’; DCWV; K& Co; scrap pattern paper
Image: ‘Vino Basket Fill’ digital stamp by Paper Squirrel
SVG: ‘Basket’ by The Creative Pointe
Stamps: SU! ‘Wonderful Words’
Inks: Distress Ink ‘Old Paper’, ‘Crushed Olive’; Ranger Archival Ink ‘Coffee’; SU! watercolor pencils
Embellishments: Webster’s Pages designer trim; Hobby Lobby crocheted lace ribbon; Papertrey Ink rustic button twine

Tools: aqua pen; foam ink blending tool; scallop scissors; foam tape; Tim Holtz paper distresser; hole punch; Cricut Expresssion; Sure-Cuts-A-Lot; ink jet printer; Stamp-a-ma-jig; Krylon Workable Fixatif
Misc: scrap cardboard

Friday, September 16, 2011

Free Digi Friday: Vino Basket Fill

Chateau Grand Traverse
I'm wrapping up the fall-themed basket fill digis with today's free "Vino Basket Fill".  Michigan has quite a few wineries and is particularly known for its whites.  The nip of Autumn in the air this week brings to mind the harvest and the wonderful wine tasting tours available this time of year.  If you're looking for a great fall wine getaway, I suggest the wineries on Old Mission and Leelanau Peninsulas near Traverse City. 
 
**EDITED**
Friday Free Digis are free for one week. This digital stamp is now available for purchase. To order, go to the side bar, enter the stamp name shown below and click 'buy now' to pay via Pay Pal.

Cost: $2.00
Stamp Name: Vino Basket Fill
I will email you the file within 24 hours of receiving payment.

You can pick up the coordinating Basket SVG file and/or print-and-cut file from The Creative Pointe.  

Some of the leaves and grape bunches are designed to hang over the edge of the basket.  This will be a great digi/SVG combo to use to scrapbook that romantic wine weekend!  :-)

Next week I'll bring you a new fall-themed fall digi.  Please become a follower so you don't miss out!

Wednesday, September 14, 2011

Pumpkin Basket Bi-Fold Card

Have you downloaded the Pumpkin Basket Fill digi yet?  Oh, and don't forget its coordinating Basket SVG or print-and-cut files from The Creative Pointe!  Friday brings a whole new digi, so be sure to grab the Pumpkin Fill digi while it's free!

Sharing a bi-fold card tonight that I made using the Pumpkin and Basket combo.  I didn't want your "run of the mill" single fold card like usual, so I designed this one as a bi-fold card with a big cameo center.  It ties at the side in a simple bow so it's like unwrapping a little gift for the recipient.

A Few Details:
  • I printed the digi on two different orange-y autumn-type pattern papers, cut them out, and paper-pieced them so that the top and bottom pumpkins are the same and the center pumpkin is from a different pattern.
  • I used Distress Inks, Distress Stains, and an aqua pen to add shading to the pumpkins and color to the leaves and stem.
  • The basket was cut from pattern papers this time for some extra texture.  It too was shaded with Distress Ink and an aqua pen.
  • Here you see how the bi-fold opens:


Challenges:

Supplies:
Paper
: SU! cardstock ‘Really Rust’, ‘Going Gray’; K&Co.; misc. scrap pattern papers
Image: ‘Pumpkin Basket Fill’ digital stamp by Paper Squirrel
SVG:  ‘Basket’ SVG file by The Creative Pointe
Stamps: JoAnn
Inks: DI ‘Wild Honey’, ‘Vintage Photo’, ‘Forest Moss’; Distress Stain ‘Rusty Hinge’, ‘Crushed Olive’; StazOn ‘Timber Brown’; LePen ‘Brown’
Embellishments: fibers

Tools: scallop scissors; Martha Stewart score board; SCAL; Cricut Expression; Inkjet printer; aqua pen; Coluzzle; Krylon Workable Fixatif

Friday, September 9, 2011

Free Digi Friday: Pumpkin Basket Fill

Today's free digital stamp is a Pumpkin Basket Fill.  Remember, the basket fill digis are specifically designed to use with The Creative Pointe's "Basket" SVG file that you can still get for free.  (If you are not an SVG user, Cindy also has a print-and-cut basket file for you). 


**EDITED**
Friday Free Digis are free for one week. This digital stamp is now available for purchase. To order, go to the side bar, enter the stamp name shown below and click 'buy now' to pay via Pay Pal.

Cost: $2.00
Stamp Name: Pumpkin Basket Fill
I will email you the file within 24 hours of receiving payment.

Perfect for the entire Autumn season...Halloween, Thanksgiving, etc., this pumpkin stack is extremely versatile and I know that you all will come up with some creative uses for it.  I'll be playing around with it as well, and will post an example project in the upcoming week, so check back!

Layering these two files results in an adorable image!

Don't miss out on a single free digi...become a follower today!

Wednesday, September 7, 2011

Autumn Blessings Tag

Did you grab the "Apple Basket Fill" digi yet?  If not, you still have a little time left to get it for free...remember, Friday will bring a brand new free digi. 

I used the apples and basket combo to make this Autumn Blessings tag, layered up with reminders of Fall...crisp apples, primitive alphabet paper, ruler twill tape, twine. 

The Details:
  • I quickly and easily colored a manila tag with Distress Stains, applying Rusty Hinge horizontally and Pumice Stone vertically.
  • I layered up two pattern papers with their torn edges distressed using Old Paper DI and applied ruler twill tape along the bottom edge.
  • I border-punched two sides of a third pattern paper, crinkled, and distressed it and applied that vertically.
  • I printed the "Apple Basket Fill" digital stamp onto SU! So Saffron card stock and colored the apples using Distress Stains and Inks with an aqua pen.  Don't forget to spray your prints with a workable fixative (I use Krylon) before coloring so your ink will not bleed into your colors.  Also, be sure to spray outside or in a well ventilated area!
  • The basket was cut using my Cricut, SCAL, and The Creative Pointe's SVG file that you can get for free HERE.  I applied the basket to the tag using foam tape to make it pop.
  • The final touches were the stamped sentiment and a variety of buttons, twine, and ribbon.

I have a friend with an upcoming September birthday, so I think I'll use this tag to decorate a kraft gift bag for her.

Supplies:
Paper
: manila tag; K&Co; Daisy D’s; SU! cardstock ‘So Saffron’, ‘Going Gray’, ‘Close to Cocoa’; PTI cardstock ‘Kraft’; scrap pattern paper
Image: ‘Apple Basket Fill’ by Paper Squirrel
SVG:  ‘Basket’ by The Creative Pointe
Stamps: JoAnn
Inks: Distress Stain ‘Barn Door’, ‘Aged Mahogany’, ‘Rusty Hinge’, ‘Pumice Stone’, ‘Crushed Olive’; Distress Ink ‘Forest Moss’, ‘Old Paper’; Archival Ink ‘Coffee’
Embellishments: buttons; thread; PTI rustic button twine; TH safety pin; Ribbon Trends ruler twill tape; American Crafts grosgrain ribbon

Tools: EK Success border punch; aqua pen; 3M foam tape; TH paper distresser, foam ink blending tool; glue dots; SCAL; Cricut Expression; ink jet printer; Krylon ‘Workable Fixtatif’

Friday, September 2, 2011

Free Digi Friday: Apple Basket Fill

The Sunflower Basket digi and SVG / printable collaboration between The Creative Pointe and Paper Squirrel was a hit!  And the good news is that I've got several more basket fill digis coming your way in next few weeks.  Your baskets will be overflowing with options!  You can still nab the Basket SVG and/or print-and-cut file for free at Cindy's blog. 

This week's free digital stamp is this "Apple Basket Fill".  Perfect for September...use for back-to-school projects, orchard or cider mill visit layouts, and cards!


**EDITED**
Friday Free Digis are free for one week. This digital stamp is now available for purchase. To order, go to the side bar, enter the stamp name shown below and click 'buy now' to pay via Pay Pal.

Cost: $2.00
Stamp Name: Apple Basket Fill
I will email you the file within 24 hours of receiving payment.

Just print and/or cut and layer!

As usual, I'll be featuring today's digi in a project in the coming week, so if you're not already, please become a follower so you don't miss it!

Sunday, August 28, 2011

Challenges Entry: Top of the Class Card

I've been having a lot of fun lately with The Creative Pointe's new SVG file set called "School Set".  Cindy's put together a great collection of back-to-school images that you can purchase from either Cut and Create or TKO Scraps


One thing that I want to point out on the "School Set" images above...
Because this is an SVG file set and not a cutter cartrige, well, number one, it's a heck of a lot CHEAPER!!  But, my real point is that you can actually use just the pencil or just the "Back to School" wording, or use them together as shown.  Also, if you want a long, thin pencil, you can do that too!  SVG (scalable vector graphic) files are just that versatile!

A Few Details:
  • On my Top of the Class card, I've again combined my "School Girl" digital stamp with a cut image (using the CP School Set, Sure-Cuts-A-Lot and my Cricut).  This time, I've stood her on a stack of school books.  I love that the spines have been left open so that you can write your own subjects or sentiment, like I did here. 
  • I embossed the background with the Tim Holtz notebook texture fade, brought out the embossing with Vintage Photo Distress Ink, and distressed the edges even more with Aged Mahogany Distress Stain. 
  •  A strip of primitive alphabet pattern paper (a new sheet!...I cut into a new sheet!), some Papertrey Ink button twine, and of course, a button, finish things off. 

The Challenges:

Supplies:
Paper
: SU! cardstock ‘Ruby Red’, ‘Basic Black’; Be Inspired; Daisy D’s; PTI cardstock ‘Kraft’
Image: ‘School Girl’ digital stamp by Paper Squirrel
SVG: ‘School Set’ by The Creative Pointe
Inks: DI ‘Vintage Photo’, ‘Old Paper’; Distress Stain ‘Aged Mahogany’; Martha Stewart craft markers; Le Pen ‘Brown’; Glaze Pen ‘White’
Embellishments: PTI rustic button twine; button; TH Texture Fade ‘Notebook’

Tools: scallop scissors; 3M foam tape;  glue dots; Texture Boutique; SCAL; Cricut Expression; ink jet printer; foam ink blending tool

Friday, August 26, 2011

Free Digi Friday: Sunflower Basket Fill

Loving all the creative time I've had the past week, and very sad that soon I will have to return to the real world...and my real job.  But, I am surely grateful that I am gainfully employed and can support myself, the boy cats, and my craft addition!

Today's free digital stamp is this "Sunflower Basket Fill".  This digi is specifically designed to coordinate with The Creative Pointe's free "Basket" SVG file, so be sure to zip on over to Cindy's blog to nab this fab-o basket (which is super versatile on its own).  And no worries if you're not set-up to cut SVG files...she also has a printable basket file for you.

**EDITED**
Friday Free Digis are free for one week. This digital stamp is now available for purchase. To order, go to the side bar, enter the stamp name shown below and click 'buy now' to pay via Pay Pal.

Cost: $2.00
Stamp Name: Sunflower Basket Fill
I will email you the file within 24 hours of receiving payment.

I actually completed my example project in time to post with the digi this week!  (Did I mention that I love being on vacay?...oh, that's right, I did...)  I was also organized enough to plan this card for a few challenges out there in blogland.  I'll be this organized again when I'm next on vacation!  :-)

The Challenges:


Supplies:
Paper
: SU! ‘So Saffron’, ‘Going Gray’, ‘Naturals Ivory’; PTI ‘Kraft’, ‘Dark Chocolate’; scrap pattern papers
Image: Sunflower Basket Fill digital stamp by Paper Squirrel
SVG:  Basket by The Creative Pointe
Stamps: Cloud 9 Simple Thoughts ‘Memories’
Inks: DI ‘Vintage Photo’, ‘Old Paper’, ‘Forest Moss’, ‘Wild Honey’; Distress Stains ‘Spiced Marmalade’, ‘Rusty Hinge’, ‘Brushed Corduroy’, ‘Crushed Olive’; Martha Stewart craft markers; Le Pen ‘Black’
Embellishments: Glossy Accents; crocheted lace ribbon; PTI rustic button twine

Tools: foam ink blending tool; foam tape; TH paper distresser; Sure-Cuts-A-Lot; Cricut Expression; ink jet printer

Tuesday, August 23, 2011

Class Act Card

Combined efforts with The Creative Pointe to create this "Class Act" card featuring Friday's School Girl digital stamp.  I love how perfectly is Cindy's School House complements our little school girl!  You can pick up this SVG file for FREE at The Creative Pointe.

The Details:
  • The School House SVG was cut from scraps of red, black, and yellow papers/cardstock.  Instead of using the base layer, I added crinkled Tim Holtz kraft glassine behind the windows and door opening.  I like the vintage-y look this gives it.  I then outlined the bell, doors, and windows in black pen and added shading with distress inks/stains and an aqua pen.
  • The School Girl digital stamp was printed on kraft cardstock and sunflower print patterned paper.  I love paper piecing dresses on my digital stamps...so much easier and prettier than trying to create that pattern through coloring!  I added color and shading/highlight with marker, distress inks/stains, and an aqua pen.  She's attached to the card with foam tape for extra dimension between her and the school house.
  • The path was cut from a scrap of kraft cardstock using deckle edge scissors, then shaded with Vintage Photo DI.
  • The notebook paper and tape section was cut from a K&Co Trinket tag and shaded with Old Paper DI.  I hand lettered "You're A Class Act!" in brown Le Pen.

Supplies:
Paper
: Stampin’ Up! cardstock ‘So Saffron’, ‘Basic Black’; Papertrey Ink cardstock ‘Kraft’; scrap patterned papers; Tim Holtz Kraft Glassine; K&Co Studio 112 ‘Trinket Tags’
Image: ‘School Girl’ digital stamp by Paper Squirrel
SVG: ‘School House’ by The Creative Pointe
Inks: Distress Ink ‘Vintage Photo’, ‘Old Paper’, ‘Wild Honey’; Distress Stains ‘Victorian Velvet’, ‘Barn Door’, ‘Picket Fence’, ‘Aged Mahogany’, ‘Spiced Marmalade’, ‘Brushed Corduroy’; Le Pen ‘Black’, ‘Brown’
Embellishments: buttons; PTI rustic button twine

Tools: foam tape; glue dots; scallop scissors; Sure-Cuts-A-Lot; Cricut Expression; inkjet printer

Monday, August 15, 2011

The Witching Hour

I had an epiphany the other day on a new way to use the Fancy Flourishes Two SVG set from The Creative Pointe.  I love when I get inspired and I'm not even crafting!  But I'm always bummed if I don't have a pen and paper with me to jot down the idea, because those don't always stick.  Luckily, this time I was able to jot down a sketch.


The Details:
  • The Scroll Hanger - it took a few steps to give it an antique bronze appearance...
    • The scroll hanger is part of the Fancy Flourishes Two SVG file set.  I cut the scroll three times from cereal box cardboard and glued all the layers together, making sure that the plain Kraft side was facing out. 
    • I then applied black antiquing gel to the front and back using a make-up sponge.  I pounced the gel on with varying thickness, but made sure to have good coverage overall and also made sure to get all the edges.
    • At this point, I punched my attachment holes in my scroll.
    • Once the antiquing gel was dry, I applied several layers of Ultra Thick Embossing Enamel (UTEE) to the front and back. 
      • Be careful when applying UTEE to both sides of something...you'll basically end up with one good side and one okay side because when applying the heat to one side, the UTEE on both sides heats up.  I found it was best to get the front the way I wanted it, then apply one layer to the back, heating it carefully while holding it up and away from my surface (with tweezers).  This keeps the front as cool as possible while you heat the back.
    • After the UTEE cooled, I pounced on Sandal Alcohol Ink to antique the color and to create a matte finish (AIs take away the glossy finish on UTEE). 
    • I then sprayed the front of the scroll with Heirloom Gold Perfect Pearls Mist and reheated the UTEE just enough for the mist to be absorbed into the UTEE. 

  • The Placard
    • The base was created by layering decorative paper onto heavy cardboard, then embossing both using Tim Holtz's Collage Texture Fade.
    • The paper was originally a pretty bright yellow-orange, but I antiqued it using the black antiquing gel.
    • I then layered lace and gingham ribbon onto the base.
    • The "Spooky Old Woman" image is from The Graphics Fairy.
    • Her witch hat is hand cut from grunge paper, colored with black antiquing gel, highlighted with gold and white pens, and finally antiqued with Vintage Photo DI and Walnut Stain Distress Stickles.  The band is a piece of decorative paper.
    • I printed the "Beware the Witching Hour" on a piece of cardstock, sketched a scroll around it, cut it out, distressed the edges, and added Old Paper, Vintage Photo, and Crushed Olive DI.   It's only glued to the placard at either end allowing the banner to bow out a bit for some dimension.
    • The clock is actually a button that I got on clearance at JoAnn.  I distressed the face with a touch of Sandal Alcohol ink. 
    • The gingham ribbons are distressed using Crushed Olive, Vintage Photo, and a mist of Heirloom Gold Perfect Pearls Mist.
    • The placard is attached to the scroll hanger using two sizes of TH jump rings and Making Memories trinket pins (these are fab-o and can be found at Archiver's).

Linking back to Brag Monday at The Graphics Fairy...


Supplies:
Paper
: SU! cardstock ‘Naturals Cream’; TH grunge paper; scrap background paper
Image: Graphics Fairy ‘pa-womancabinetcard-graphicsfairy012sm’
SVG:  The Creative Point ‘Fancy Flourishes Two’
Inks: DI ‘Vintage Photo’, ‘Crushed Olive’, ‘Old Paper’; Delta Black Antiquing Gel; Versamark; Alcohol Ink ‘Sandal’; Le Pen ‘Black’; Glaze pen ‘White’; Zig Writer ‘Metallic Gold’
Embellishments: Perfect Pearls Mist ‘Heirloom Gold’; JHB clock button; Wright’s lace hem facing; TH texture fade ‘Collage’; Distress Stickles ‘Walnut Stain’; Ultra Thick Embossing Enamel ‘Clear’; TH jump rings; Making Memories trinket pins; ribbon; K&Co embossed frame

Tools: foam ink blending tool; felt ink blending tool; SU! eyelet hole punch; heat gun; 3M foam tape; tweezers; Sure-Cuts-A-Lot (SCAL); Cricut Expression; ink jet printer; stylus; TH paper distresser; Texture Boutique; make-up sponge; Glossy Accents; embossing powder tray
Misc: cereal box