Showing posts with label Birthday. Show all posts

Wednesday, November 26, 2014

Purple Posies

Happy Thanksgiving week, friends!

Just thought I'd do a quick post with the birthday card I made for my SIL this year.  She's quite a bit younger than my husband and me and is a bit bohemian, so I tried to incorporate her personality into this card...  The background paper makes it a little artsy, the flowers and colors keep it feminine, and the twine and pearls are a classic touch.


Thanks for visiting!

Thursday, October 16, 2014

Pink Power

Sharing a hot pink card made for my SIL's birthday back in August.  These early "back to crafting after baby" cards are super simple!  But even the simplest hand made card lets the recipient know you care enough to take the time to make it.

On a side note, pink has been on my mind a lot lately since two dear friends have been diagnosed with breast cancer within a few weeks of each other.  Remember to self exam, schedule regular mammograms when you're of age, and save the boobies!


Thanks for the visit!

Sunday, October 12, 2014

It's Been a Long Time...

...about 10 months, in fact!

Where have I been?  Well, you see, there's been a lot happening here in the squirrel's nest over the last year or so.  In June 2013, Mr. Squirrel joined the nest.  In June 2014, Baby Squirrel arrived!  Yes, it's been a whirlwind year full of night sickness and being the most tired I've ever been in my life, then mommy-mode, and now working-mommy-mode!  While I was pregnant, I had NO creative mojo...none, nada, zilch!  But, I've been slowly getting back to the craft room inbetween feedings, diaper changes, and cuddles....oh, and that pesky work thing.

My posts will be simpler, but I'm excited to be sharing my creations once again!

First up is a card that I made for my BIL's birthday.  A bit of Tim and a bit of fun make for a simple masculine card.

Thanks for the visit!


Monday, September 9, 2013

Fun With Photo Props!

We're back with a new season of fun and inspiration at Creative Cutting Challenge.  If you love using SVG files with your electronic cutter, this challenge blog is for you.  Not sure what an SVG file is and don't want to miss out?  Check out this post and then this post from Cindy at The Creative Pointe.  She does a great job explaining what SVG files are and how they can accentuate your creativity.  Even if you don't use SVGs yet, there are plenty of creative ideas from our very talented Design Team, so please check it out!

Our theme this fortnight is "Anything Goes"...we're starting out easy, so there's no excuse not to play along!

The Creative Pointe's Photo Props SVG set has so many possibilities.

The most obvious use is to cut the props exactly as Cindy has scaled them for true photo props (these were SO MUCH FUN at our wedding!!).

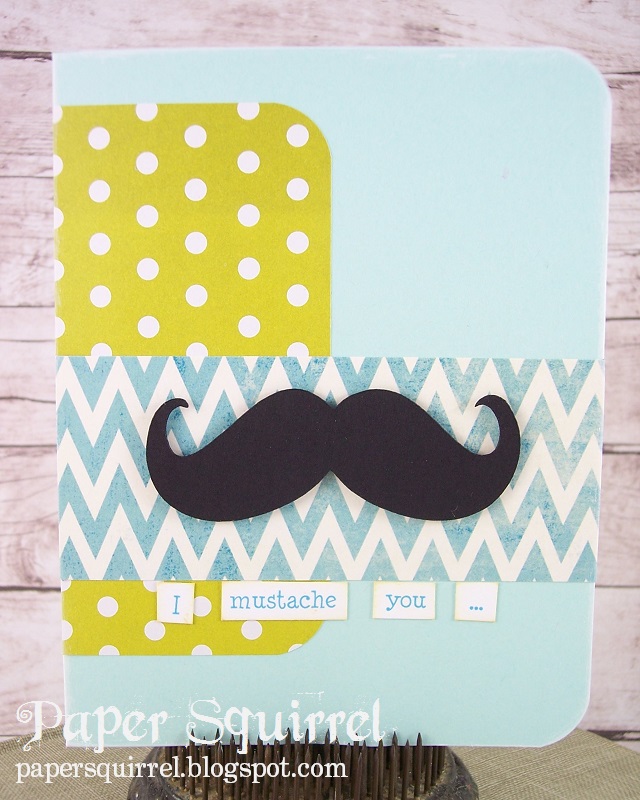
For my design team project, I wanted to give you even more inspiration for this fabulous set...and there was a bit of selfish-ness involved.  After being away from the craft room for a while this summer, I was getting very low on birthday cards, especially some suitably masculine ones.  These punny cards were quick and easy to make using scrap patterned papers, Cricut, and laser printer.  I used foam tape behind the SVG cut outs to give them a bit more prevalence.

Trendy times two...mustache + chevron patterned paper!

Here kitty, kitty...this one's purrrfect for feminine birthday, congratulations, friendship, etc.  Graduated dots of Perfect Pearls accent the cat's eye glasses.

I have so many more ideas for this SVG set, so I'm sure I'll be featuring it again.
Don't forget to join the challenge...you can win free stuff!  J

More Challenge Fun
Cards in Envy: Manly Challenge
Make It Monday: MIM #157
Unstampabelles: Challenge #27 - Using Scraps and/or old Stash (No Stamps)

Supplies: Mustache
Cardstock:Papertrey Ink ‘Aqua Mist’, ‘White’, ‘Black’
Patterned Paper: My Mind’s Eye Fine & Dandy ‘Tickled Pink’; scrap
SVG: The Creative Pointe ‘Photo Props’
Inks:Distress Ink ‘Old Paper’; Adirondack paint dabber ‘Snow Cap’
Tools: Sure-Cuts-A-Lot; Cricut Expression; 3M foam tape; foam ink blending tool; tweezers; EK Success punch ‘Corner Rounder’

Supplies: Cat’s Eye Glasses
Cardstock: Papertrey Ink ‘Soft Stone, ‘White’; Stampin’ Up! ‘Not Quite Navy’
Patterned Paper:  Scraps
SVG:  The Creative Pointe ‘Photo Props’
Inks: Distress Ink ‘Old Paper’; Adirondack paint dabber ‘Snow Cap’
Embellishments: Liquid Pearls ‘White Opal’
Tools:  Sure-Cuts-A-Lot; Cricut Expression; 3M foam tape; foam ink blending tool; tweezers; EK Success punch ‘Corner Rounder’

Wednesday, April 24, 2013

Creative Spirit

My niece definitely has the creative spirit, so for her birthday this year, I wanted an extra-fun card that embodies the artsy and vintage-y things she loves.

The Details:
  • I started with a kraft stock base and layered on some re-purposed Tim Holtz tissue paper that had been colored and used as wrapping paper (waste not!).  I tore the edges to roughly fit my card size and used spray adhesive to attach it in all its tattered and wrinkled glory.  Several swipes with a Snow Cap paint dabber lighten it and blend it into the kraft base a bit.
  • Next up, some beautiful butterfly patterned paper from My Mind's Eye.  I tattered the edges with Tim's paper distresser and attached it with my tiny attacher.  A touch of lace adorns the top edge.
  • A girly subway-type sign was cut from a 6x6 My Mind's Eye collage paper.  Again, the edges were tattered and colored with Tumbled Glass Distress Stain to stand out from the background.  
  • Butterflies cut from the patterned paper flutter around the sentiment.  I also layered a couple on top of the patterned paper section to make it look like they were coming to life and then flying away.
  • Finally, our collage-y girl.  This was fussy-cut from a postcard I've had in the stash.  I loved the image and always had it in my mind that I would use it for my niece.

This card was fun to make.  It was one of those times where I just let myself go and added elements as the mood and inspiration struck.  Ahh...creativity feels so good when it flows!

Challenges:
Going Grey with Scrap-Creations Challenge: Insects or Animals
Oldie But a Goodie Challenge: Make It Girly (postcard)
Gingerloft Challenge: GL Torn and Distressed
ABC Challenges: ABC25 - Recycle
Cards in Envy: Things with Wings!
Make It Monday: MIM #137
The Kraft Journal: Make It Monday with Kraft Outlet - Recycle or Re-Use
Three Scrappy Gals: April is Earthy!

Supplies:
Cardstock: Papertrey Ink ‘Kraft’
Patterned Paper:  My Mind’s Eye Miss Caroline ‘Dolled Up’ 6x6, ‘Fiddlesticks’ 6x6; Tim Holtz tissue paper (re-purposed)
Inks: Adirondack paint dabber ‘Snow Cap’; Distress Stain ‘Tumbled Glass’
Embellishments: Postcard; lace trim; pearl stickers
Tools:  TH paper distresser, tiny attacher; 3M foam tape; Glossy Accents; tweezers

Monday, February 4, 2013

CCC #9: Love Abundantly

We always need birthday cards on hand, right?

Our two-week "Birthday Cards" theme at Creative Cutting Challenge will help motivate you to get re-stocked!  Click here to check out the creative inspiration from our Design Team and join the challenge.  Even if you don't use SVG files yet, it's definitely worth looking...these ladies always come up with some great ideas!

I love the look of rolled paper flowers, but the technique eluded me.  I tried it once, failed miserably, became frustrated, threw them away, and moved on.  (Yep, a full-on craftantrum!)  For this challenge, I gave them another shot.  And did some YouTube research first!  So now, I'm pretty embarrassed because these are seriously so EASY!  My problem (other than a short fuse)?  I started rolling from the wrong end!  Oh, and my craft tweezers were a huge help.  Geez.

Now that I've figured it out (eye-roll), I'm pretty sure I will be doing a lot of rolling, rolling, rolling...

A Couple Details:
  • I used The Creative Pointe's "Rolled Roses" SVG set for my flowers.  She has three great options in this set. I used the scalloped version and it makes the prettiest rose!  Using the SVG file was fast and allowed me to scale my two flowers at various sizes.
  • Would you ever guess that the scrap paper I used for the roses is a postage stamp collage patterned paper? It really rolled up lovely!
  • I didn't have grey ink (can you believe that?!), so I inked the frame in jet black Archival, stamped once on a scrap paper, then stamped again on my cardstock for a lovely shade of grey.

Challenges:

Supplies:
Cardstock: Stampin’ Up! ‘Sahara Sand’, ‘Confetti White’
Patterned Paper:  My Mind’s Eye Lost & Found Two ‘Blush’; scraps
SVG:  The Creative Pointe ‘Rolled Roses’
Stamps: MME Lost & Found Madison Avenue ‘Pretty’; SU! ‘It’s Your Birthday’
Inks: Archival ‘Jet Black’; SU! classic ‘Rose Romance’
Embellishments: Papertrey Ink leaf ribbon; K&Co diecut ‘Spring Blossom Seed’; washi tape
Tools:  3M foam tape; Glossy Accents; tweezers; Stamp-a-ma-jig

Thursday, September 20, 2012

The Best Friend

I'm pretty sure that I could never buy another thing and I would still never use up all of my craft "stuff".  But they are always coming out with new "stuff" that I just have to have.  It's a conspiracy, I tell you!  (Yeah, I know, it's called Capitalism! J)

So, once in a while I focus on using up some of the older items in my stash.  I nearly always ask myself, "why did I wait so long to use this?!"  Today's card features a chipboard rose that blended perfectly with (uh, shocker, I know) some autumnal-toned My Mind's Eye papers.

A Few Details:
  • I used markers to bring a little more depth out of the chipboard rose.  I also touched the edges with Alcohol Inks to give a stained vintage look.
  • Alcohol Inks on the metal rim and Distress Stains in the center helped the little round tag get with the vintage program as well.  Can you believe that this little guy started life as a bright white tag with a bright silver rim?
  • The color scheme on this card is almost scrumptious...shades of chocolate and caramel and a little mint...yum.  Perfect for the best friend a girl could possibly have's upcoming September birthday!

Challenges:
Crafts and Me Challenges: #102 - Roses
Use It Tuesday: Challenge #39 - Anything Goes (chipboard rose)
Make It Monday: MIM #107

Supplies:
Cardstock: Stampin’ Up! ‘Really Rust’
Patterned Paper:  My Mind’s Eye Stella and Rose ‘Mabel’ 6x6
Stamps: MME Miss Caroline Howdy Dowdy ‘Baby’, Dolled Up ‘Favorite’
Inks: StazOn Timber Brown; SU! craft ‘Sage Shadow’; Martha Stewart craft markers; alcohol ink ‘Copper Mixative’, ‘Gold Mixative’, ‘Caramel’, ‘Blending Solution’; Perfect Pearls Mist ‘Heirloom gold’; Distress Stain ‘Old Paper’, ‘Brushed Corduroy’, ‘Pumice Stone’
Embellishments: Kaiser Craft printed chipboard ‘Secret Bird Society’; velvet ribbon; crocheted ribbon; tag; Tim Holtz jump ring, safety pin; Papertrey Ink rustic button twine
Tools:  EK Success punch ‘Graceful Heart’; Making Memories ribbon glue; Zig 2-way glue pen; Glue Dots ‘Pop Up’; Zots; felt ink blending tool

Thursday, July 5, 2012

Wind It Up!

This week's theme at Card A Day Blog is "Just for Men".  I made this state-fair-inspired masculine birthday card to celebrate my dear Dad's 77th year.

A Couple Details:
  • I love this ticket paper from My Mind's Eye Miss Caroline "Dilly Dally" collection.  It's so whimsical and works perfectly with the collage of ticket stubs, ferris wheel image, and Tim Holtz clock / game spinner. 
  • My dad has this...well, let's call it a party trick...where he takes a ruler and says that each inch equals a decade.  The maximum life expectancy of a man is 100 years, or 10 inches, and he'll mark that with one thumbnail....looks like a long time.  He then marks his current age with the other thumbnail.  Hmm...not so long anymore...  It's a sobering way to think of your age!  How many "inches" do you have left?  I starred my dad's approximate age on the tape measure in red pen.


Challenges:

Supplies:
Cardstock: Papertrey Ink ‘Kraft’
Patterned Paper:  My Mind’s Eye Miss Caroline ‘Dilly Dally’ 6x6
Image: Ferris Wheel - unknown; Tape Measure - Free Vintage Digital Stamps
Stamps: Cloud 9 Design
Inks: StazOn ‘Timber Brown’; Stampin’ Up! Writer ‘Real Red’
Embellishments: Tim Holtz clock face, game spinner, salvage stickers ‘Lost & Found’
Tools:  Zots; Glue Dots; Zig 2-way glue pen; TH paper distresser

Sunday, June 24, 2012

Howdy, Birthday Boy

Card A Day Blog's theme this week is "Teens" which just happened to work perfectly with the family birthday calendar...one of my nephews turns 18 in a few days.  (Ugh, these kids are making me feel old!)  I found this printed cowboy image in my stash and thought it would make a casual "boy card" that's not too young, not too old.

The Details:
  • As usual, I used Kraft cardstock as the base...it just always seems to be the perfect choice for masculine cards.
  • Journeyman tissue tape borders the left edge with some twine wrapped around a couple of times and a "lasso" tied neared the top. 
  • Metal accent not exactly the right color?  Never fear, alcohol inks are here!  These brads started out BRIGHT copper.  Not good for my rustic cowboy.  I dipped them in Latte and Gold Mixative AI and now they're perfectly patina-ed.
  • As a final touch, I colored a portion of a Kraft paper star border with Vintage Photo Distress Stickles.  The old penny copper color is perfect and the stars remind me of spurs.
Supplies:
InLinkz.com

Cardstock: Papertrey Ink ‘Kraft’
Patterned Paper:  My Mind’s Eye Lost & Found ‘Portobello Road’ 6x6
Image: Unknown
Inks: Alcohol Ink ‘Latte’, ‘Gold Mixative’
Embellishments: Tim Holtz tissue tape ‘Journeyman’; Stampin’ Up! brads; PTI rustic button twine; Distress Stickles ‘Vintage Photo’;
Tools:  TH paper distresser