Monday, October 31, 2011

Hey Pumpkin, Best Witches!

Happy Halloween!

I'm squeezing in the last of my Halloween projects just under the wire! I'm sad to see it go...creating for this holiday is so much fun. But of course, there's always next season...and more wonderful holidays are on their way.

I've got two projects to share with you today. The first is a "Best Witches" card showing off this past Friday's "Witch Girl" digi. And remember my goal to make something with each and every stamp set that my PayPal addiction has brought to my mailbox lately? Well, one of those sets was a Halloween set, so I wanted to squeeze that one in tonight too!

First up, "Best Witches"...
I printed the "Witch Girl" on SU! Sahara Sand, colored her with markers, cut the ends like a banner and added layers of Halloween-y papers, buttons, and twine.

Close up of the "Witch Girl" coloring:

A scalloped edge, a few buttons, a touch of twine...

Challenges:


Next, we have "Hey Pumpkin"!
The "Haunted" stamp set from Cosmo Cricket is such quirky fun...I just love the crazy pumpkin and the non-scary skeleton that is waving at his pumpkin friend. The base on this 4"x4" ornament is a scrap of cardboard covered in pattern paper. The skeleton was embossed in Zing Opaque White, the pumpkin stamped in SU! Pumpkin Pie, then embossed in Zing Clear powder.


Kind of spooky how the skeleton seems to be glowing in this photo:


Best Witches Supplies
Paper
: Stampin’ Up! cardstock ‘Sahara Sand’, ‘Pumpkin Pie’; DCWV

Image: ‘Witch Girl’ digital stamp by Paper Squirrel
Stamps: Cosmo Cricket ‘Haunted’
Inks: Colorbox pigment ‘Black’; Versamark; SU! Stampin’ Write markers; Martha Stewart markers
Embellishments: hemp cord; buttons

Tools: SU! ¼” circle punch; hole punch; glue dots; scallop scissors

Hey Pumpkin Supplies
Paper
: Bo Bunny Press ‘Dem Bones’; Stampin’ Up! cardstock ‘Old Olive’, ‘Apricot Appeal’, ‘Basic Black’

Stamps: Cosmo Cricket ‘Haunted’
Inks: Colorbox pigment ‘Black’; Versamark; SU! craft ‘Pumpkin Pie’
Embellishments: hemp cord; photo corners; Zing embossing powder ‘Opaque White’, ‘Clear’

Tools: 3M foam tape; Tim Holtz paper distresser; foam ink blending tool; hole punch; heat gun
Misc:  cardboard

Saturday, October 29, 2011

CADB Design Team: Ornamental Joy

We're giving you tons of Christmas card inspiration from now until the big day over at Card A Day Blog.  I'm very excited about this week's "Ornaments" theme.  I love reacquainting myself with each Christmas ornament as I place it on the tree.  Some very special ornaments conjure memories of my grandmothers who have long since passed away.  I'm sure most of us have a few of those cherished Christmas ornaments.


The Details:
  • The card base is Papertrey Ink's Kraft cardstock that has Old Paper Distress Ink applied along the edges and Perfect Pearl Mist lightly sprayed over the surface.
  • The next layer is a strip of pattern paper from Basic Grey's Figgy Pudding line.  One edge has been torn and all the edges have been distressed with Old Paper DI.
  • Next, a rectangle of red and white polka dot scrap paper with the edges punched to make it look like a ticket is layered on.
  • At this point, I gave the whole card another spritz of Perfect Pearl Mist.
  • Inkadinkado's beautiful ornament was stamped onto Stampin' Up! Chocolate Chip cardstock using Encore Ultimate Metallic gold ink.  This is such an amazing ink!  To even out the gold and make it even more intensely metallic, I brushed on some antique gold Pearl Ex powder while the ink was still wet.  (Encore Ultimate Metallic is a pigment ink, so you have time to play and/or use it for embossing.)
  • When the ink was dry, I fussy cut the ornament and tied gold organza ribbon and gold metallic cord around the "hanger".
  • I made a rosette from K&Co's Bailey line and adhered the cut out ornament to the center. To accent the ornament even more, I added dots of Scribbles pearl dimensional paint and gold Stickles.

  • Lastly, I stamped "Joy" in Stampin' Up! Craft Chocolate Chip onto a scrap of green pattern paper.  I cut around the image with scallop scissors, adhered it to the card, and "dotted" the "J" with a pearl bead.
 

Hope you're inspired to get started on your Christmas cards...it's just around the corner (I know, I don't like to think about it either)!


Supplies:
Paper
: Papertrey Ink cardstock ‘Kraft’; Basic Grey ‘Figgy Pudding’; K&Co “Bailey”; scraps
Stamps: Inkadinkado; Stampin’ Up!
Inks: Encore Ultimate Metallic ‘Gold’; Stampin’ Up! Craft ‘Chocolate Chip’; Perfect Pearls Mist ‘Perfect Pearl’
Embellishments: Pearl Ex Powder ‘Antique Gold’; Scribbles ‘Pearl’; Stickles ‘Gold’; Stampin’ Up! gold metallic cord; gold organza ribbon; pearl

Tools: dry paint brush; hot glue; scallop scissors; hole punch

Friday, October 28, 2011

Free Digi Friday: Witch Girl

Just a few more days until that magical night called HALLOWEEN!  Today's little Witch Girl digital stamp is just in time for you to whip up some last-minute Halloween projects.  She's all dressed up in her costume and ready to ring your doorbell trick-or-treating!


**EDITED**
Friday Free Digis are free for one week. This digital stamp is now available for purchase. To order, go to the side bar, enter the stamp name shown below and click 'buy now' to pay via Pay Pal.
Cost: $2.00
Stamp Name: Witch Girl
I will email you the file within 24 hours of receiving payment.


Friday digis are usually only free for one week.  Become a follower so you never miss out!  :-)

Thursday, October 27, 2011

Turkey Tag Card

This is the second installment in my family Thanksgiving card series.  I fell in love with my sister's turkey stamp and used him in three of the four cards you'll be seeing.  This time, I stamped him on one of those great K&Co journaling tags.

Some Details:
  • The turkey was stamped directly onto the K&Co journaling tag using Timber Brown StazOn ink, colored with marker, and given a layer of Glossy Accents to make him pop.
  • I mounted the tag onto a scrap of cardboard, cut to fit, then distressed and antiqued the edges.  After adding a bit of twine to the top, I attached it to the card with foam tape for dimension.
  • I again made my own charms by stamping two different size leaves onto kraft cardstock, coloring the veins, adding some Vintage Photo Distress Stickles and Glossy Accents, and then fussy cutting.  Some Tim Holtz jump rings and trinket pin and voila!...custom charms!
  • I also incorporated a scrap of Tim Holtz Kraft Glassine behind the leaves.  It's embossed with the woodgrain texture fade and "nailed" on with some antique copper brads.


Challenges:
Simon Says Stamp - Anything Goes
Cards for Men - Challenge #22 Animals
Cheerful Stamp Pad - Challenge #28 First Thanksgiving


Supplies:
Paper
: Papertrey Ink cardstock ‘Dark Chocolate’; Tim Holtz Kraft Glassine; K&Co Studio 112 Tag ‘Ornate’; scraps
Stamps: JoAnn; Stampin’ Up!
Inks: Distress Ink ‘Vintage Photo’, ‘Old Paper’; StazOn ‘Timber Brown’; Martha Stewart craft markers; Distress Stain ‘Brushed Corduroy’
Embellishments: Glossy Accents; Distress Stickles ‘Vintage Photo’; brads; TH texture fade ‘Woodgrain’; PTI rustic button twine; gingham ribbon; organza ribbon; TH jump rings; TH trinket pin

Tools: 3M foam tape; Sizzix Texture Boutique; foam ink blending tool; TH paper distresser; scallop scissors
Misc: scrap cardboard

Tuesday, October 25, 2011

The Heart of Autumn Card

While Halloween is not yet upon us, Thanksgiving (U.S.) is just around the corner!  Since I don't always see my entire immediate family on this holiday, I send Thanksgiving cards each year to my parents, sisters, and brother.  The Heart of Autumn Card I'm sharing today is the first of these cards made specifically for my family (sorry guys, I know most of you follow me, so unfortunately, you won't be very surprised!).

A Few Details:
  • The turkey was stamped in Timber Brown StazOn, fussy cut, colored with marker, and given a layer of Glossy Accents.  Learned a little lesson of what not to do on this project.  Don't set your turkey aside for the GA to dry, forget about him, and then set a piece of paper on top...ugh!
Lesson learned!
  • The second turkey I made is mounted in an oval of Tim Holtz Kraft Glassine that was scalloped, stamped, crinkled, and embellished with Vintage Photo Distress Stickles.

  • I made my own charm by stamping the acorn in Timber Brown StazOn, fussy cutting, and adding  some Vintage Photo Distress Stickles. I then added a layer of Glossy Accents.  Once dry, the Glossy Accents gives the paper some strength so that it doesn't wear or tear hanging from the Tim Holtz jump ring and trinket pin.

Challenges:


Supplies:
Paper
: Papertrey Ink cardstock ‘Kraft’; Tim Holtz Kraft Glassine; scraps
Stamps: Inkadinkado; JoAnn; Stampin’ Up!
Inks: StazOn ‘Timber Brown’; Distress Ink ‘Old Paper’; Distress Stain ‘Pumice Stone’, ‘Brushed Corduroy’
Embellishments: Glossy Accents; Distress Stickles ‘Vintage Photo’; Wrights lace hem facing ‘Beige’; PTI rustic button twine; Hobby Lobby velvet ribbon; gingham ribbon; TH trinket pin; TH jump ring

Tools: TH paper distresser; glue dots; 3M foam tape; scallop scissors

Friday, October 21, 2011

Lil' Pumpkin Baby

The work baby shower theme was Pumpkins and one of the girls found this idea online and asked me to replicate it.  How cute is this?!!

And so simple!  Just draw the face with permanent marker, cut a hole for the pacifier, and tie some ribbon on the stem.

We had one for each baby and then had a larger pumpkin with "Baby So-and-So" and the due date.  I cut the letters from brown card stock using my Cricut and SCAL, and gave them a light spray of Heirloom Gold Perfect Pearls Mist.  I also cut the hearts using the Cricut and SCAL, wrote the due dates in brown pen, distressed the edges with Tattered Rose.  Spray adhesive worked perfectly to stick the letters and hearts to the pumpkins.

Thursday, October 20, 2011

Baby Boom!

We're having a mini baby boom at work...two baby girls, one due in November, one in December.  We recently had a baby shower for the moms-to-be and I volunteered to make the cards that everyone would sign.  We have twenty-some people in our department and I knew I had to make bigger cards than my usual half-a-piece-of-8-1/2 x 11, so I started designing 4-1/4 x 5-1/2 size cards.  That's when I discovered that the very few baby stamps that I do own are TINY!  Well, Cricut and Sure-Cuts-A-Lot to the rescue!  I chose a pretty font and cut "Baby" out of brown cardstock.  Then I cut two ovals...one cream and one patterned and scalloped the patterned one with decorative scissors.  The rest was just layering decorative papers, buttons, hand-dyed seam binding, and Tim Holtz safety pins.


Yes, they are both supposedly girls, but there's been some back-and-forth between boy and girl with the one, so I played it safe and added more blue on that card.  As far as I'm concerned, it's not for sure until that baby is born!

We also had some of the most adorable decorations that I'll share tomorrow, so check back!

Tuesday, October 18, 2011

Autumn Blessings Pumpkin Sign

In addition to the larger Pumpkin Welcome Sign, I also created a couple of smaller Autumn Blessings Pumpkin Signs...one as a hostess gift and one as an auction donation.  These went together very quickly and are easy to do as multiples since the finished size is about 5-1/2" wide and two can be cut on one 12 x 12 mat at the same time.  Could make a great hostess gift for Thanksgiving!


For the most part, the steps were the same as for making the Pumpkin Welcome Sign from Sunday's post, but instead of the "Welcome" letters, I cut a tag and border using Sure-Cuts-A-Lot and stamped "Autumn Blessings" in Coffee Archival Ink.

I again used just the background portion of Cindy's free leaf SVG.  You can get it for free at The Creative Pointe.

Remember, The Creative Pointe's super cute "Fall Set" can be purchased from Cut and Create.

Sunday, October 16, 2011

Pumpkin Welcome Sign

As soon as I saw The Creative Pointe's "Fall Set", I knew exactly what I wanted to do with that pumpkin SVG!  I gave this welcome sign to a friend for her birthday along with a yummy pumpkin-scented candle.  It turned out so cute, that I wish I would have made one for myself!


The Details:
  • The Creative Pointe's super cute "Fall Set" can be purchased from Cut and Create.
  • I scaled the pumpkin SVG to approx. 10" wide and cut the solid back piece from patterned paper and the sections outline piece from solid card stock.
  • Once those were cut, I scaled the solid back piece down just a touch and cut two more pieces from scrap cardboard, making sure that the back of the pumpkin would be plain cardboard and not the cereal label!  Layered up, this gives the pumpkin a good thickness for its size.  Scaling the cardboard down just that little bit makes it a lot easier to make sure that everything lines up nice and neat and you don't have any extra cardboard showing on the front.  (When I say "just a touch"...for example, if my front piece is 10.00", I would cut my back pieces at 9.80"...just a bit smaller.)
  • The sections outline was covered in a layer of Rock Candy Distress Crackle Paint and sprinkled with two colors of glitter while the paint was still wet.
  • Distress Stains and Inks were used to create shadows and highlights.
  • I used Sure-Cuts-A-Lot to cut the "Welcome" text from green patterned paper, adhered it to the pumpkin, and covered it in a layer of Glossy Accents.

  • The large paper leaf is one that Cindy offers as a free SVG at The Creative Pointe.  I used just the background portion here.

  • Some Stampin' Up! metal pieces glued on with Glossy Accents and strung with twine form the hanging apparatus.

  • To protect the decorative surface, I gave the finished piece a couple coats of Krylon Crystal Clear.


Challenges:
Fresh Brewed Designs - #67 Pumpkins

Friday, October 14, 2011

Free Digi Friday on Hiatus

Hello dear followers,
Free Digi Friday will be on hiatus for a couple weeks while I am in North Carolina attending the High Point Furniture Market for my real job.  (I love it, but it really gets in the way of playing in the craft studio sometimes!) 

While I do have several posts scheduled and will be bringing you more Fall, Halloween, and other crafty goodness while I'm away from home, the digis will have to wait.  However, I promise it will be worth the wait...I have a super cute one in mind for when I get back!

Thursday, October 13, 2011

Boo Coaster Hanger (& A Confession)

My name is Vicki, and I'm a craftaholic. 

I've heard the first step to recovery is admitting you have a problem...although, I admit...I don't know that I want to recover from this particular addiction!  But the fact remains:  that PayPal button is like a little devil on my shoulder whispering "buy it, buy it!" in my ear.  I've gone a little crazy with the Crafty Steals, Flowers to Flourishes, and Molly's Square purchases lately...all stamp sets.  They're just such a good DEAL!!

Okay, so I'm confessing to you because I've given myself a goal to make something from each and every one of those new sets.  This Boo Coaster Hanger is the first (it will take me a while to work through them all). 

Honestly, I was just playing around without much of a plan other than I had to use the Inkadinkado "Pumpkins Galore" stamp set.  Halfway in, I didn't like it much...thought it was going to be a big flop.  But I love the end result...yay!  It's great when things come together suddenly and surprise you.

A Few Details & A Technique:
  • The base is a Papertrey Ink coaster covered in bright orange mulberry paper that was toned down with Rusty Hinge and Pumice Stone Distress Stains.

  • The purple tag is from K&Co's Studio 112 line.  They come in packs of 24 and were in the $1 bin at JoAnn Etc!

  • The pumpkin was stamped in StazOn Jet Black, then colored with marker.  I then covered the pumpkin and the stem in Glossy Accents.  Technique:  While the Glossy Accents was still wet, I added Peeled Paint Distresss Stickles to the stem and dragged them through the Glossy Accents up along the curve of the stem with a sewing needle, sort of mixing the Stickles and GA.  On the pumpkin, I added dots of Orange Peel Stickles to where the design showed circles.  These I did not blend and when everything dried, it looks like little gems set into the shiny surface of the GA...so cool!  Give it a try!

Challenges:


Supplies:
Paper
: PTI coaster; mulberry paper; K&Co Studio 112 tag; Paper Adventures
Stamps: Inkadinkadoo ‘Pumpkins Galore’; Basic Grey ‘Boo’, ‘Spooky’
Inks: Distress Stain ‘Rusty Hinge’, ‘Pumice Stone’, ‘Chipped Sapphire’, ‘Aged Mahogany’; StazOn ‘Jet Black’; Distress Ink ‘Old Paper’
Embellishments: Distress Stickles ‘Peeled Paint’; Stickles ‘Black Diamond’, ‘Orange Peel’; Glossy Accents; Tim Holtz tissue tape ‘Symphony’; wire; ribbon

Tools: 3M foam tape; spray adhesive; hole punch

Tuesday, October 11, 2011

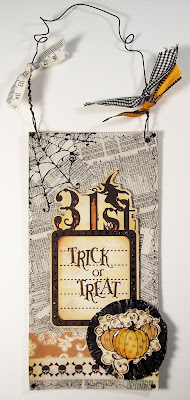
Trick or Treat Hanger

I just love Halloween!  And I just love making things for Halloween.  Today, I'm sharing a Trick or Treat wall hanging I made using some left over cardboard, a phone book, some Inkadinkadoo stamps, and elements from My Mind's Eye "The Spider's Web".

Just a Couple Details:
  • I saved several pieces of cardboard from work that are just the perfect weight and size for decorative hangings (approx. 4"x8").  I used one for the base and covered it in torn pieces of an old phone book using Claudine Hellmuth Medium.  It created such a fun black and white text background! 

  • I created a simple rosette from black crepe paper and added sparkle to the edges with Black Soot Distress Stickles.  Some stamped pumpkins form the centerpiece of the rosette, the front one accented with a layer of Glossy Accents.


Challenges:


Supplies:
Paper
: My Mind’s Eye ‘The Spider’s Web’; recycled phone book page
Stamps: Inkadinkadoo
Inks: Distress Ink ‘Old Paper’, ‘Spiced Marmalade’; Distress Stain ‘Brushed Corduroy’, ‘Rusty Hinge’; Martha Stewart craft markers; StazOn ‘Jet Black’; Micron pen
Embellishments: Distress Stickles ‘Black Soot’; crepe paper; Glossy Accents; wire; ribbons

Tools: water pen; thread; needle; 3M foam tape; foam ink blending tool; Claudine Hellmuth Studio Multi Medium Matte; wire cutter
Misc: cardboard

Sunday, October 9, 2011

Spooky Tree Ornament

I used this week's Spooky Tree digital stamp to create a macabe Halloween ornament.  Coloring the image was super quick and easy with the help of my Distress Stains.  And I like the eeiry look that the blending colors lend to the image.

The Details:
  • I printed my image on SU! Sahara Sand cardstock and gave it a coat of Krylon Workable Fixatif.  This is an important step when you plan on using markers, inks, or stains to color your printed images so that the printer ink does not smear.  Just be sure to spray it outside or in a well ventilated area.  I then adhered the image to a cardboard base and cut it out with my Coluzzle.
  • Starting in the center of the moon, I used a variety of Distress Stains in a circlular motion to color my creepy image.  I colored the owl with marker.
  • A section of Tim Holtz filmstrip, some spooky stamps from Basic Grey, and touches of stickles finished off the oval.  As a finishing touch, I added black and white baker's twine and a black crepe paper ruffle.
  • You may have noticed that the Black Soot Distress Stickle dots around the top right edge are not up to my usual standards.  Well, that would be the work of one Mr. Dodger who got up on my craft table to play with the crepe paper while I was upstairs cooking dinner.  By the time I realized it, the stickles were dry and I scraped away as much as I could, but darn those things stick well!  Bad kitty!! 


Supplies:
Paper
: SU! cardstock ‘Sahara Sand’
Image: ‘Spooky Tree’ digital stamp by Paper Squirrel
Stamps: Basic Grey ‘Spooky’, ‘Boo’
Inks: Distress Stains ‘Spiced Marmalade’, ‘Bundled Sage’, ‘Pumice Stone’, ‘Crushed Olive’; Martha Stewart craft markers; SU! craft ‘Ruby Red’; StazOn ‘Jet Black’
Embellishments: The Beadery hemp cord; TH filmstrip; Glossy Accents; Stickles ‘Lime Green’; Distress Stickles ‘Fired Brick’, ‘Black Soot’
Tools: Coluzzle; inkjet printer; Krylon Workable Fixatif; TH paper distresser; hole punch

Friday, October 7, 2011

Free Digi Friday: Spooky Tree

Another Friday, another Free Digi!  Today's is a "Spooky Tree" that should be really fun for Halloween projects, so get crafting!


**EDITED**
Friday Free Digis are free for one week. This digital stamp is now available for purchase. To order, go to the side bar, enter the stamp name shown below and click 'buy now' to pay via Pay Pal.
Cost: $2.00
Stamp Name: Spooky Tree
I will email you the file within 24 hours of receiving payment.

Remember, Friday Free Digis are usually only free for one week, so become a follower, so you never miss out.  :-)

Thursday, October 6, 2011

Pumpkin Trio "Boo!" Card

I wanted to show the versatility of this week's free "Pumpkin Trio" digital stamp for my example project and just love the result!  While the pumpkins are perfect for the whole fall season as-is, I added scary jack-o-lantern faces for this Halloween card.  Just a few triangles and circles with a black marker is all it takes...easy, peasy!


A Few Details:
  • The Pumpkin Trio was printed on K&Co pattern paper, layered on card stock, and fussy cut.  After I drew on the faces, I used watercolor pencils and a blender pen to add more color and shading.  The cut out image was adhered with foam tape for dimension and then covered in a layer of Glossy Accents to help it "pop".
  • The journal ATC was originally cream, but I used a combination of Distress Inks and Stains to make it just the right color, then distressed the edges and stamped "Boo" in black pigment ink.
  • I also custom-colored the gingham ribbon to fit my card...never be deterred by a "wrong" color!  Distress Inks and Stains, and Alcohol Inks are great for modifying colors...Ranger just works wonders, don't they?

Challenges:


Supplies:
Paper
: K&Co pattern paper; Stampin’ Up! cardstock ‘Really Rust’
Image: ‘Pumpkin Trio’ digital stamp by Paper Squirrel
Stamps: Basic Grey ‘Boo’, ‘Halloween’
Inks: Distress Ink ‘Spiced Marmalade’, ‘Wild Honey’, ‘Vintage Photo’; Distress Stain ‘Rusty Hinge’; ColorBox pigment ink ‘Black’; LePen ‘Black’; SU! watercolor pencils; SU! blender pen
Embellishments: Oriental Trading Co. journal ATC; ribbon; staples; Glossy Accents
Tools: Tim Holtz paper distresser; foam ink blending tool; 3M foam tape; stapler
Misc: ink jet printer

Tuesday, October 4, 2011

Slow-Mo Scrapper, That's Me!

Ask my family or any of my other scrapbooking buddies and they will tell you, I am an extremely SLOW scrapper!  I just love the details and can sometimes get caught up in them.  Last weekend's crop was not quite 1-1/2 days long and I finished 2 cards, 4 pages, and started 2 more pages, so I was on FIRE!  :-) 

Page #1 - my Mom's Birthday 2010

Pages #3 & 4 - My Nephew's High School Graduation 2010


I used the Cricut a lot this weekend for letters, but also used it on this page with one of The Creative Pointe's SVG files to create the header.  I did alter the SVG (yes, you can do that with Sure-Cuts-A-Lot!) to remove the 2011 date since my nephew graduated in 2010.  You can purchase this and all of Cindy's great SVGs from either Cut and Create or TKO Scraps
Here's what the original file looks like:

Page #4 - Grandpa's Ring
The story of my Grandfather's signet ring and how it is now being passed down through the generations.

I'll share the cards I made in another post.  Hope you enjoyed this peek at my scrap album.