Tuesday, January 29, 2013

Will You Be My Bridesmaid?

I know I've been pretty quiet since the new year, but I've been pretty busy for the last month working on wedding plans!  Yep, I've finally met my Mr. Right and we're getting married.  In June.  2013.  So, yeah, not a lot of time to get everything ready, especially since I'll be doing all the stationery and most of the decorations myself!

So, if I have long spans between posts, you'll at least know that I'm working on some fabulous wedding project that I will eventually share with you.

Here's my first wedding-related project.  I wanted a fun way to officially ask my two sisters and best friend to be my bridesmaids.

A Detail or Two:
  • Now, I need to explain that my bridesmaids range in age from mid-30s to early 50s, so the joke has been that my oldest sister will be the oldest bridesmaid ever.  Hence the "No, I'm too old"...I'm not just being incredibly mean...it's an inside joke.  LOL!
  • These were so simple.  Just a fun vintage photo found online and printed on Papertrey Ink Sweet Blush cardstock with some wording. 
  • I filled in their names by hand and then wrote a personalized message to each woman on the back.
  • I presented them when we went dress shopping.  There were tears.  We all found dresses.  It was a good day.  J

Monday, January 21, 2013

CCC #8: All My Love

Our current two-week Creative Cutting Challenge theme is "Valentine's Day Cards".  Click here to check out the creative inspiration from our Design Team and join the challenge.  Even if you don't use SVG files yet, it's definitely worth looking...you never know what will inspire you!

My card is for my own valentine.  It's a bit of a challenge to make a Valentine's Day card masculine.  I just love pink, red, and white used together, so I decided not to fight it.  I used the pink and red and white, but grounded it all with some aqua blue and a kraft base.  Kraft makes everything more masculine.  J

The Details:
  • Let's start from the bottom up since the background is my favorite thing about this card.  I can't believe I haven't thought of it earlier...it's super easy and I used to do it all the time with acrylic paint projects.  I started with plain kraft cardstock, took an old toothbrush and swirled it in a small puddle of Barn Door Distress Stain that I squeezed out onto my craft mat.  I then spattered the cardstock by running my thumb through the bristles, making the stain fly off the toothbrush.  
    • TIPS:  
      1. Test your technique on some scrap paper first, you may need more or less ink
      2. Lay your card in a scrap box or wastebasket to capture the overspray
      3. Wear gloves or use a palette knife instead of your finger to "flick" the bristles

  • "Love" is from The Creative Pointe's "Valentine" SVG file set.  I cut it from aqua cardstock, gave it a light coat of Tumbled Glass DS and Rock Candy Distress Crackle Paint for some color depth and surface texture.
  • The hearts were cut on my Cricut using a standard shape file that came with my Sure-Cuts-A-Lot (SCAL) program.  I applied adhesive just to the center of these so that the edges would pop up a bit.  Some faux stitching was created with a white Glaze pen.
  • And finally, the sentiment was printed on white cardstock, cut into individual words, and applied to the base.

Challenges:
Pile It On:  Challenge #3 - Have a Heart!
Card Makin' Mamas: A Simple Little Challenge - CAS
Craft Us Crazy: Challenge #35 - Celebrate Love

Supplies:
Cardstock: Papertrey Ink ‘Kraft’, ‘Aqua Mist’; Stampin’ Up! ‘Confetti White’
Patterned Paper:  Fancy Pants ‘Love’ 6x6; scraps
SVG:  The Creative Pointe ‘Valentine’
Inks: Distress Stain ‘Barn Door’, ‘Tumbled Glass’; Adirondack paint dabber ‘Snow Cap’; Glaze pen ‘White’
Embellishments: Distress Crackle Paint ‘Clear Rock Candy’
Tools:  Toothbrush; SCAL; Cricut Expression; 3M spray adhesive; ruler

Wednesday, January 9, 2013

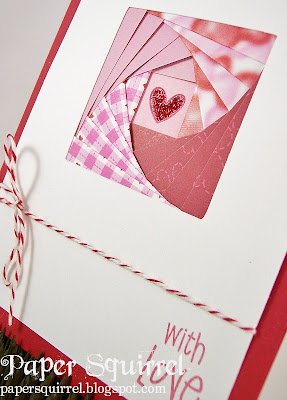
With Love

This week's challenge theme at Card a Day Blog is Valentine's Day.  As today's featured designer, I decided to share the Valentine version of an iris folding pattern I learned from my mom.  It's amazingly versatile!  Just change the colors and patterns and the whole look changes for the season.  Iris folding in general is also a great way to use up smaller scraps.  I was able to incorporate three different patterns of Valentine scraps and a solid on this card.

Just a Few Details:
  • The pattern my mom taught me is from a book that she purchased, so I cannot share it here, however, there are TONS of free patterns out in internet-land.  
  • I found a small heart stamp in my stash that fit perfectly in the iris.  I added some Xmas Red Stickles for that extra-special sparkly Valentine touch.
  • A simple red and white baker's twine bow and stamped sentiment really pull things together.  I love the clean and simple look of this card.


Supplies:
Cardstock: Stampin’ Up! ‘Ultrasmooth White’, ‘Real Red’
Patterned Paper:  Scraps
Stamps: Hero Arts
Inks: SU! craft ink ‘Real Red’
Embellishments: Stickles ‘Xmas Red’; Papertrey Ink baker’s twine

Monday, January 7, 2013

CCC #7: You Hold the Key

Happy New Year!
We're back from holiday break and the theme for our seventh two-week Creative Cutting Challenge is "Valentine's Day - Not a Card".  Click here to check out the creative inspiration from our Design Team and join the challenge.  Even if you don't use SVG files yet, you will find some great ideas from these talented ladies!

I love making Valentine's Day crafts.  Something about all the red and pink and hearts and glitter takes me back to making my Valentine "mail box" out of a shoe box or paper bag back in elementary school...those were the days!

I went a little "grungy" with this heart locket.  There was so much ink involved, I actually snapped on the ol' latex gloves.
The Details:
  • I started by cutting the heart locket from The Creative Pointe's "Valentine Hearts" SVG set out of cereal box cardboard.  It measures approximately 5" high.
  • For the base, I used metallic Distress Stains, a little Starburst Spray, and some Walnut Stain Distress Ink to create a rustic metal look.  For a little more interest, and to keep up my resolution to include stamping on my projects whenever possible, I also added some French script in clear embossing over the top of the first inky layer.  For an even more corroded appearance, I used Tim Holtz's technique of flicking water onto the inked surface...this reactivates the Distress Inks and gives it a really cool effect.
  • I sprayed the center inset piece with Lindy's Stamp Gang Starburst Spray in Tiger Lily Red Orange.  I used Barn Door Distress Ink to deepen the red, then added a layer of Rock Candy Distress Crackle Paint.  The crackle paint adds such depth to the color!
  • Once the CP was dry, I antiqued the surface with a little Walnut Stain DI and added the "you hold the key" sections.
  • I layered a sheet music image from The Graphics Fairy in the key hole and then glued the center inset piece to the base.
  • Some hand-dyed seam binding in a crinkly, fluffy bow and a K&Co. key finish things off nicely.

Challenges:

Supplies:
Cardstock: Papertrey Ink ‘Pure Poppy’ (backing)
SVG:  The Creative Pointe ‘Valentine Hearts
Image: The Graphics Fairy ‘Sheet Music Postcard
Stamps: Stampin’ Up! ‘French Script’
Inks: Distress Stain ‘Brushed Pewter’, ‘Tarnished Brass’, ‘Aged Mahogany’; Lindy’s Stamp Gang Starburst Spray ‘Tiger Lily Red Orange’; Distress Ink ‘Barn Door’, ‘Walnut Stain’, ‘Festive Berries’; Top Boss embossing ink
Embellishments: Zing embossing powder ‘Clear’; Distress Crackle Paint ‘Clear Rock Candy’; K&Co. metal art ‘Life’s Journey’; Hug Snug seam binding
Tools:  3M spray adhesive; Glossy Accents; Mister; heat gun; SCAL; Cricut Expression; foam brush; foam ink blending tool; tweezers
Misc: Recycled cereal box