Wednesday, December 19, 2012

Let It Snow Pocket Ornament

Wow, the days to Christmas are just FLYING by!!!  I still have too many things on my "to do" list...ugh.

Every year, I give my niece and nephews a handmade ornament as part of their Christmas present...(knowing that they won't truly appreciate it until they are older and have a tree of their own).  Today I'm sharing the pocket ornament I made for my youngest nephew.  His was easy since he's only four...the older boys' ornaments were more of a challenge, but that's for another day.

Some Quick Details:
  • If you're a regular reader, I'm sure you've already guessed that the base on this is an empty toilet paper tube. 
  • I used some fun-colored My Mind's Eye papers and elements to cover the raw t.p. tube.
  • It's whip-stitched along the bottom with red and white baker's twine and layered up with a felt snowflake, an adorable snowman image, buttons, etc.
  • Deciding on filler for the pocket was a bit tricky.  I finally settled on some glittered holly sprigs and a piece of  silver "scarfing"...mainly because these elements work well here and on the ornaments for the older boys.

Challenges:
Creative Belli Blog: Belli Challenge #159 - Christmas
Simon Says Stamp:  Simon Says...Merry Christmas
Celebrate the Occasion: Challenge #93 - Christmas: Anything Goes
Flourishes: Timeless Tuesday #200 - Deck the Tree Trimmings
Simon Says Stamp & Show: Gift-spiration

Supplies:
Patterned Paper:  My Mind’s Eye ‘Winter Wonderland’ 6x6
Embellishments: Crafty Secrets Creative Scraps; Hobby Lobby felt snowflake; buttons; Darice baker’s twine ‘Red / White’; Bazzill Half the Edge ‘White’; ribbon; wire
Tools:  3M spray adhesive; hot glue; wire cutters; hole punch; glue dots
Misc: Empty toilet paper tube

Saturday, December 15, 2012

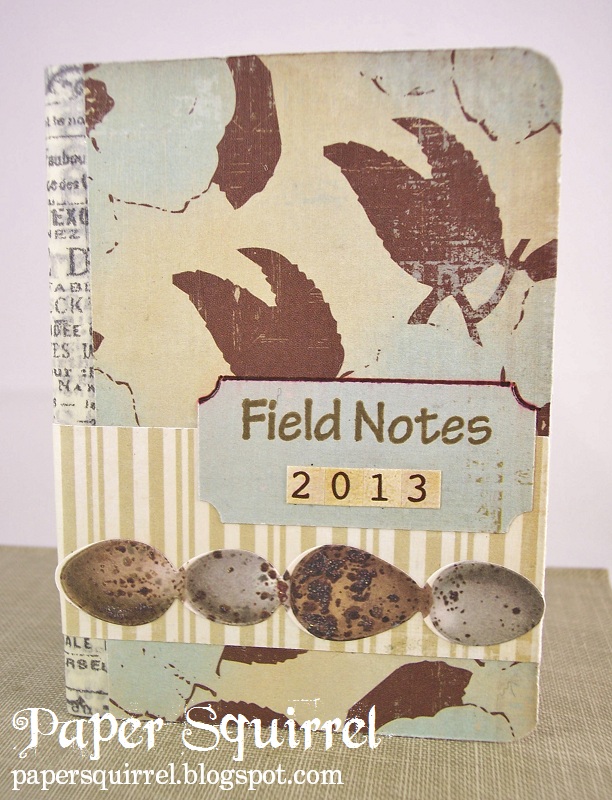
New Year's Notebooks

I'm excited to share my first Design Team project for Anything But a Card.  If you're not familiar, this bi-monthly challenge blog keeps the challenges simple...the basic guideline is that your project must be...yep, you guessed it...anything but a card!

I picked up some mini composition books at the dollar store (pkg 3 for $1) and decided to alter them into 2013 notebooks as gifts for some of my co-workers. They're the perfect purse size and I selected the papers to fit each personality.
A Couple Details:
  • I like using washi / tissue tape on the spines.  It looks great, keeps the spine flexible, and is super quick.  Use a bone folder to burnish the tape well for good adhesion.
  • With the spines covered in washi tape, you just need two rectangles of patterned paper to deal with the front and back covers.
  • Since I intend these as purse-friendly notebooks, I kept the embellishments flat and gave the finished books a coat of Glue and Seal for durability.  It gives them a lovely satin finish.

Paula's Field Notes 2013

Leslie's To Do 2013

Chandra's Take Note 2013

Paula's Field Notes 2013 Supplies:
Patterned Paper: 
My Mind’s Eye ‘Paris & Co.’ 6x6
Stamps:
7 Gypsies ‘Disclaimer’
Inks:
Archival ‘Coffee’; Le Pen ‘Brown’
Embellishments:
Bo Bunny stickers ‘Et Cetera’; K&Co. border sticker ‘BW Flora & Fauna’; Tim Holtz tissue tape ‘Nostalgic’
Tools: 
3M spray adhesive; bone folder; TH paper distresser; EK Success punch ‘Photo Labels’
Misc:
Mini composition book

Leslie's To Do 2013 Supplies:
Patterned Paper: Fancy Pants ‘Summer’s End’ 6x6
Embellishments:Bo Bunny stickers ‘Et Cetera’, ‘Welcome Home’; washi tape
Tools: 3M spray adhesive; bone folder; TH paper distresser; EK Success punch ‘Photo Labels’
Misc:Mini composition book

Chandra's Take Note 2013 Supplies:
Patterned Paper:  Fancy Pants ‘It’s the Little Things’ 6x6
Inks: Distress Ink ‘Black Soot’; Le Pen ‘Black’
Embellishments: Bo Bunny stickers ‘Et Cetera’, washi tape, K&Co. Smash tape ‘Black Dots’
Tools:  3M spray adhesive; bone folder; TH paper distresser
Misc: Mini composition book

Friday, December 14, 2012

Pastel Season's Greetings

Today I thought I'd play with some non-traditional colors for Christmas and continue my early New Year's resolution to use my stamps.  I was drawn to pastels for these cards...soft pinks, chilly aqua, and pale green...grounded with a bit of brown and accented with a bit of sparkle.

Since I'm running out of time, I made fraternal twin cards.  The only difference is the background paper.


A Few Quick Details:
  • The ornaments were stamped tone-on-tone with pigment ink, then fussy cut.  
  • The aqua ornament is bumped up with foam tape for some dimension.  
  • They "hang" from platinum glitter ribbon on lines drawn with grey Le Pen.
  • The ornaments each are accented with Rock Candy Distress Stickles on the body and Platinum Stickles on the hanger and cap.  I wish glitter photographed better.  These look a little lifeless in the photos, but have a nice glimmer in real life.
Supplies:
Cardstock: Papertrey Ink ‘Sweet Blush’, ‘Aqua Mist’; Stampin’ Up! ‘Confetti White’
Patterned Paper:  Fancy Pants ‘Winterland’
Stamps: We R Memory Keepers ‘Ornaments’; JoAnn
Inks: SU! craft ‘Sage Shadow’, ‘Regal Rose’, ‘Certainly Celery’; Archival ‘Coffee’; Le Pen ‘Dark Grey’
Embellishments: Holiday Inspirations glitter ribbon; Stickles ‘Distress Rock Candy’, ‘Platinum’
Tools:  Foam tape; Tim Holtz paper distresser

Wednesday, December 12, 2012

12.25.

If you're a regular visitor, you know that I love vintage images.  But...I own a TON of stamps.  Drawers and drawers full.  I realized that I've been seriously neglecting them.  And while I will of course continue my love affair with vintage images, I'm committing to including a stamped element whenever possible.  Call it an early New Year's Resolution.  J

Today's card is very simple...a little Scandinavian looking with it's red and white color scheme and rustic snowflake image.  This would be great for multiples in a pinch.  And look, no vintage image!

The Details:
  • The snowflake stamp is embossed in opaque white on PTI Pure Poppy.  A white button tied with red and white baker's twine accents the center.  Simple, clean, and bold!
  • A strip of Christmas chevron washi tape forms a border and white gel pen adds a "stitched" detail.
  • The "12.25" banner is stamped in green pigment, fussy cut, and stapled with Tim Holtz's tiny attacher.
And done!

Challenges:
Christmas at Sweet Stampin': Challenge #1 - Anything Goes
Divas by Design: Challenge #65 - Use some Red
Stampin' Royalty: Challenge #154 - Christmas / Winter
Anything Goes Challenge Blog: Challenge #82 - Traditional Christmas Colours
Cupcake Craft Challenges: #222 - Merry Christmas
Kaboodle Doodles Challenges: Challenge #149 - Use the Color Red
The Pink Elephant: TPE178 - Photo Inspiration

Supplies:
Cardstock: Papertrey Ink ‘Pure Poppy’; Stampin’ Up! ‘Confetti White’
Stamps: SU! ‘Snowflakes’; My Mind’s Eye ‘All is Bright’
Inks: Top Boss embossing ink; SU! craft ‘Garden Green’; Glaze gel pen ‘White’
Embellishments: Zing embossing powder ‘Opaque White’; Queen & Co trendy tape ‘Zig Zag’; button; Darice baker’s twine ‘Red / White’
Tools:  Heat gun; Tim Holtz tiny attacher, paper distresser; Glossy Accents

Monday, December 10, 2012

Peace

I've had some 8x10 canvases in the stash for a year or so now and thought I'd employ one to make a gift Christmas collage.  By using the center section of Graphic 45 Christmas Past "Ode to Joy" 12x12 paper, this lovely piece looks very detailed, but was actually quite simple and easy to put together.

 
The Details:

  • I started by painting the sides and edges of my canvas to match the golden background of the snowflake patterned paper.  Once dry, I added the patterned paper using Claudine Hellmuth Matte Multi Medium, however next time, I think I will just use spray adhesive.  Faster and guaranteed no wrinkles!
  • I fussy cut the center section of the G45 Ode to Joy page and used multi medium again to add it on top of the snowflake paper.
  • The remaining layers and embellishments were few since the patterned paper really did most of the work.  I focused on the lower left corner since it had the least amount of pattern and could be easily covered without interrupting the base image.
  • Next came a paper doily and a small digi print of French sheet music from The Graphics Fairy.
  • To this was layered a gorgeous portrait of the Madonna and Christ Child from Vintage Holiday Crafts surrounded by an embossed paper frame from K&Co (love these!).
  • The large "peace" flash card becomes the focal point.  The edges of the card were distressed and aged with Old Paper Distress Ink.  Some gold fretwork and rhinestone complement a corner and a couple bands of soft green velvet ribbon adorn the opposite side.
  • Every time I stamp on Tim Holtz grunge paper, it looks very blah because of the greyish base color.  But I love its sturdy, yet flexible, durability.  Finally, it dawned on me...cover it in book paper, paint it, THEN stamp on it!  A little Snow Cap paint dabber did the trick.  And a little Old Paper Distress Stickles made it even more vintagey.  Our little bird dangles a pretty brass snowflake charm from A Charming Place from his beak.
  • The final touch was to give key areas some holiday sparkle.  For this, I added very thin and light applications of Platinum Stickles around the borders and on the halos.

Challenges:
Supplies:
Cardstock: Grunge paper
Patterned Paper:  Graphic 45 Christmas Past ‘Ode to Joy’; vintage book page
Image: Vintage Holiday Crafts ‘Vintage Christmas Card Jesus and Mary’; The Graphics Fairy ‘French Ephemera - Sheet Music Postcard’
Stamps: My Mind’s Eye Lost & Found ‘Christmas’
Inks: Americana acrylic paint ‘French Vanilla’, ‘Antique Gold’; Adirondack paint dabber ‘Snow Cap’; Distress Stain ‘Picket Fence’; Distress Ink ‘Old Paper’; StazOn ‘Timber Brown’
Embellishments: 7 Gypsies flashcard; Hobby Lobby paper doily; K&Co. Ancestry.com embossed frames; Starform stickers ‘Gold’; velvet ribbon; A Charming Place snowflake; Distress Stickles ‘Old Paper’; Stickles ‘Platinum’; gold twine
Tools:  Tim Holtz paper distresser; Making Memories ribbon glue; 3M spray adhesive; Claudine Hellmuth Matte Multi Medium; glue dots
Misc: 8x10 canvas