Friday, September 30, 2011

Free Digi Friday: Pumpkin Trio

Friday just couldn't come soon enough this week...hooray for the weekend!  :-)

Today's free digi is a Pumpkin Trio that will work with all your fall projects from Halloween through Thanksgiving.  Have fun creating! 

(Jack-o-lantern faces are not part of the digital stamp.)

**EDITED**
Friday Free Digis are free for one week. This digital stamp is now available for purchase. To order, go to the side bar, enter the stamp name shown below and click 'buy now' to pay via Pay Pal.

Cost: $2.00
Stamp Name: Pumpkin Trio
I will email you the file within 24 hours of receiving payment.

Just a reminder that the Card A Day Blog Christmas Blog Hop starts tomorrow.  Twelve members of the CADB Design Team will have some Christmas Card inspiration for you Saturday and Sunday and many will have blog candy (including me!).  Don't miss out!

And never miss a free digi, please become a follower.  :-)

Wednesday, September 28, 2011

Scrappin' This Weekend

I'm so excited to be attending a scrapbooking event this weekend with my mom, sister, and good friend.  Not only will it be fun, but it's in support of a great cause as well.  Mary's Dream - Living Without Fear was started in honor of Mary Lynn Babb after she was stalked and killed by her abusive ex-husband.  My sister, Cindy (The Creative Pointe), worked with Mary, so this tragedy really hit close to home.  Each year since her death, Mary's family holds several different fundraisers, one of which is this scrapbooking event.  Mary's Dream also works to educate and bring about legislation to help protect victims of domestic violence. 

Here we are, the Fabulous Scrap Queens at last year's event.  It's not every day past the age of seven that a girl can wear hot pink, a tiara, kiddie costume earrings, and practice her "royal" wave!

With that said, I've officially entered "crazy time" at work in preparation for our big bi-annual trade show.  In trying to stay organized and ahead of things this week, I packed up my stash for this fabulous weekend and *gasp* failed to create an example using the Pumpkin Scarecrow!  So sorry, dear followers!  Something tells me you will bear with me, especially since there's so much goodness coming your way this weekend!
  • Friday...well of course, it's a new free digi!
  • Saturday...Day 1 of the Card a Day Blog Christmas Blog Hop.  A Christmas Card for inspiration and there's BLOG CANDY!!
  • Sunday...Day 2 of the CADB Christmas Blog Hop.  Another inspiring Christmas Card and another chance at candy!

So the morals of this story? 
  1. Check out Mary's Dream - Living Without Fear and don't let someone you love (including yourself) live with domestic violence.
  2. Don't pack your stuff before making example projects (oh wait, that one's just for me).
  3. Come back on Friday!
  4. Come back on Saturday!
  5. Come back on Sunday!

Monday, September 26, 2011

Scare-dy Cat Card

Finally, here is the last card in the series using using Tim Holtz's "Mini Halloween" stamp set from Stamper's Anonymous.   All four cards feature the same stamp set and pattern papers, but I think this one is my favorite. 

The Details:
  • The backgound is Stampin' Up! Basic Black with the spiderweb stamped in white pigment ink and distressed with Old Paper DI.
  • I made a rosette out of black crepe paper and layered on a scalloped circle of the dot pattern paper that I colored with Rusty Hinge Distress Stain.  To this, I added the scaredy cat, cut out and highlighted with glossy accents.  His eyes are colored with green marker and have dots of Lime Green stickles for a little mischevious sparkle (much like my Ollie's green eyes).
  • I recycled a telephone book page and used it here as a ruffle.  To prep, I first crinkled it, then colored it with Rusty Hinge Distress Stain, then tore the edges once it was dry. 
  • I again used my 7 Gypsies border punch to create a cute border strip, but this time ran orange cardstock behind it and added dots of Walnut Stain Distress Stickles.

Here's the completed series.  You can see that I used common elements and colors, but each card has it's own unique layout and focal point.


Challenges:

Supplies:
Paper
: SU! cardstock ‘Basic Black’, ‘Naturals Ivory’, ‘Really Rust’; My Mind’s Eye ‘The Spider’s Web’; Bo Bunny Press ‘Dem Bones’; recycled phone book page
Stamps: Stamper’s Anonymous TH ‘Mini Halloween’
Inks: DI ‘Old Paper’; StazOn ‘Jet Black’; Distress Stain ‘Rusty Hinge’; Martha Stewart craft markers; SU! Craft ‘White’
Embellishments: Distress Stickles ‘Walnut Stain’; crepe paper; Glossy Accents; Stickles ‘Lime Green’; button; PTI rustic button twine
Tools: heat gun; thread; needle; Fiskars scallop circle punch; 7 Gypsies border punch kit; glue dots; foam ink blending tool

Sunday, September 25, 2011

Crow Halloween Card

Today's card is number three in the series using Tim Holtz's awesome "Mini Halloween" stamp set.   All four cards feature this same stamp set and pattern papers. It was so fun to reorganize and rearrange the elements to create four unique cards.

A Couple Details:
  • The "moon" behind the crow is punched circle of the polka-dot paper, but colored with Brushed Corduroy Distress Stain.
  • I used glossy accents on the crow and adhered him with foam tape to give him a little dimension.
  • I used my 7 Gypsies border punch kit on the skeleton paper, then ran some ribbon through the holes.  The ribbon was a little bright, so I deepened the color with Distress Stain.
 
If you missed them, check out the first two cards in the series:
 The last card is coming soon...it's my favorite!  :-)


Supplies:
Paper
: My Mind’s Eye ‘The Spider’s Web’ PTI card stock ‘Kraft’; Bo Bunny Press ‘Dem Bones’; SU! cardstock ‘Naturals Ivory’
Stamps: Stamper’s Anonymous TH ‘Mini Halloween’; Canadian Maple Collections
Inks: DI ‘Old Paper’; StazOn ‘Jet Black’; Versamark; Distress Stain ‘Brushed Corduroy’
Embellishments: ribbon; button; PTI rustic button twine; Glossy Accents

Tools: circle punch; 3M foam tape; glue dots; foam ink blending tool; TH paper distresser; scallop scissors; Fiskars corner rounder punch; 7 Gypsies border punch kit; aqua pen

Friday, September 23, 2011

Free Digi Friday: Pumpkin Scarecrow

Happy Friday, ya'll!  It's time for another free digi.  This happy Pumpkin Scarecrow would love to be included on your Fall projects.  Have fun creating!


**EDITED**
Friday Free Digis are free for one week. This digital stamp is now available for purchase. To order, go to the side bar, enter the stamp name shown below and click 'buy now' to pay via Pay Pal.

Cost: $2.00
Stamp Name: Pumpkin Scarecrow
I will email you the file within 24 hours of receiving payment.

Please become a follower so you never miss a free digi (and lots of other fun, too)!

Thursday, September 22, 2011

Vino Basket Tag

I hope you liked the basket fill digis from the past few weeks.  I used this week's "Vino Basket Fill" to create a fancy gift tag for...well, what else...a bottle of wine!  I left the back of the tag plain and clean so that I can address it with to/from and maybe a brief message to the recipient. 

A Few Details:
  • The basket SVG and tag were cut using Sure-Cuts-A-Lot and my Cricut.  SCAL comes with a lot of basic shape files and this tag was one of them.  I love that I can scale everything to suit my exact wants and needs (how often do you get to say that in life?!).  The tag measures approx. 3" wide x 5.5" tall.
  • If you haven't downloaded the basket yet, the SVG and print-and-cut files are still available at The Creative Pointe.
  • I printed the Vino Basket Fill digi on Stampin' Up! Almost Amethyst cardstock and sprayed it with a light layer of Krylon Workable Fixatif to set the ink.  I then used SU! watercolor pencils and an aqua pen to color the image.

  • Since I only left myself *just* enough room at the bottom of the tag for "Celebrate", I used my handy-dandy Stamp-a-ma-jig to position the word perfectly.  Do you have a Stamp-a-ma-jig?  I don't use it all the time, but when you really need to stamp it right the first time, it's the best!

And here's what it looks like dressing up that bottle of vino:

Tomorrow brings a new digi, so don't forget to snag the "Vino Basket Fill" digi while it's still free!

Challenges:

Supplies:
Paper
: SU! cardstock ‘Almost Amethyst’, ‘Going Grey’; DCWV; K& Co; scrap pattern paper
Image: ‘Vino Basket Fill’ digital stamp by Paper Squirrel
SVG: ‘Basket’ by The Creative Pointe
Stamps: SU! ‘Wonderful Words’
Inks: Distress Ink ‘Old Paper’, ‘Crushed Olive’; Ranger Archival Ink ‘Coffee’; SU! watercolor pencils
Embellishments: Webster’s Pages designer trim; Hobby Lobby crocheted lace ribbon; Papertrey Ink rustic button twine

Tools: aqua pen; foam ink blending tool; scallop scissors; foam tape; Tim Holtz paper distresser; hole punch; Cricut Expresssion; Sure-Cuts-A-Lot; ink jet printer; Stamp-a-ma-jig; Krylon Workable Fixatif
Misc: scrap cardboard

Tuesday, September 20, 2011

Spooky Slides Card

Sharing another card using Tim Holtz's awesome "Mini Halloween" stamp set.  This is number two of a four card series that I started while on my "craftcation" in August.  Remember the Skeleton Card from a few weeks back?  That was the first.  All four cards feature the same stamp set and pattern papers. 

The Details:
  • I started with a raw chipboard slide frame that I colored using Rusty Hinge Distress Stain.  I wanted a distressed look, so I was not concerned with making sure that the color was even.  I then brushed on a layer of "Rock Candy" Distress Crackle Paint.
  • The "Mini Halloween" stamp set images were stamped on white vellum.  I stamped them with StazOn Jet Black ink so that I wouldn't have to wait long for the ink to dry or worry about smearing. 

  • I wanted a very linear design to accentuate the slide frame, so in addition to the scalloped pattern paper, I also added a row of "Walnut Stain" Distress Stickle dots and a skeleton paper/ribbon combo strip.  The ribbon is woven through holes punched using my 7 Gypsies border punch kit.
  • The button was not quite the right color, so I modified it with Gold and Copper Alcohol Ink Mixatives.

I really had a lot of fun creating this series.  With each card, I got a new idea for the next card!  Stay tuned for the next two!


Challenges:

Supplies:
Paper
: My Mind’s Eye ‘The Spider’s Web’; Stampin’ Up! cardstock ‘Basic Black’, ‘Naturals Ivory’; Bo Bunny Press ‘Dem Bones’, SU! vellum
Stamps: Stamper’s Anonymous Tim Holtz ‘Mini Halloween’; SU! ‘All Year Cheer’
Inks: Distress Ink ‘Old Paper’; StazOn ‘Jet Black’; Distress Stain ‘Rusty Hinge’; Alcohol Ink ‘Gold’, ‘Copper’, ‘Blending Solution’; Distress Crackle Paint ‘Rock Candy’
Embellishments: Distress Stickles ‘Walnut Stain’; ribbon; button; Papertrey Ink rustic button twine; chipboard slide frame
Tools: TH paper distresser; glue dots; foam ink blending tool; felt ink blending tool; scallop scissors; 7 Gypsies border punch kit

Sunday, September 18, 2011

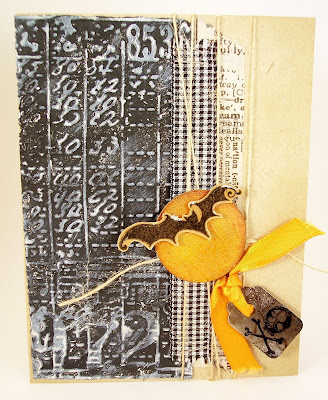
Card A Day Blog Design Team: Bats & Cats Card

I'm excited to announce that I'm part of a great design team for the new "Card A Day Blog".  CADB features weekly themes, monthly challenges, and inspiration everyday!  This week's theme is Cats & Bats and my card is today's feature card.

The Details:
  • I've been seeing a lot of bloggers creating with foil tape lately and just HAD to run to the hardware store and get a roll of my own!  (It's in the heating & cooling section...used for duct work).
  • First, I embossed a section of foil tape using Tim Holtz's "Collage" texture fade.  Next I sponged on black acrylic paint and once dry, used an emery board to scratch some paint off the high areas.  I then took my Picket Fence Distress Stain and LIGHTLY dragged it across the high areas.  Just enough to bring out the letters without covering up the black background.
  • A bonus of foil tape is that it's self-adhesive.  I adhered the finished foil background along the left edge of a Papertrey Ink Kraft card. 
  • To the right of the foil background, I layered random pieces of Tim Holtz tissue tape, then stapled a length of black & white gingham ribbon between these two layers and wound some Papertrey Ink baker's twine over that.  (I love layers!)
  • At this point, I distressed the edges of the card with Old Paper Distress Ink.
  • The "moon" started life as a chipboard circle.  I colored it with Distress Stains, then added a layer of Rock Candy Distress Crackle Paint, and finally shaded the edges with Distress Inks.
  • The bat was stamped in StazOn Jet Black on the kraft side of a scrap piece of cardboard (cereal box) so it would have some thickness when cut out.  I covered the bat in glossy accents and once dry, layered it using foam tape to "fly" across the moon.
  • The metal tag started out as very shiny silver, but with the help of Mushroom Alcohol ink, StazOn Jet Black, and Picket Fence Distress Stain, it now looks corroded...perfect for a Halloween card!  The skull and crossbones is stamped in StazOn Jet Black.  Be sure to use a solvent ink like StazOn when stamping on non-porous surfaces.  Water-based inks will bead up and smear.  (Also be sure to clean your stamp immediately after using a solvent ink!)  A snippet of orange ribbon and a glue dot holds the tag in place.
  • Don't worry, I didn't forget about the cat...he's on the inside!  A scrap of Stampin' Up! Pumpkin Pie cardstock and some black photo corners dress up the inside of this card.  The cat is stamped in Champagne Versamark Dazzle so he sparkles just a little.

Thanks for stopping by and if you're new here, I hope you've been inspired to become a follower of both Paper Squirrel and Card A Day Blog!

Supplies:
Paper
: Papertrey Ink cardstock ‘Kraft’; Stampin’ Up! cardstock ‘Pumpkin Pie’
Stamps: Basic Grey ‘Spooky’; SU! ‘All Year Cheer’
Inks: Americana acrylic paint ‘Lamp Black’; Distress Stain ‘Spiced Marmalade’, ‘Rusty Hinge’, ‘Picket Fence’; Distress Ink ‘Old Paper’; StazOn ‘Jet Black’; Versamark Dazzle ‘Champagne’; Alcohol Ink ‘Mushroom’, ‘Blending Solution’
Embellishments: Glossy Accents; Distress Crackle Paint ‘Rock Candy’; PTI rustic button twine; Tim Holtz texture fade ‘Collage’; SU! chipboard circle; SU! metal tag; black & white gingham ribbon; staples; TH tissue tape ‘Symphony’; aluminum foil tape; satin ribbon; Canson photo corners

Tools: foam ink blending tool; stapler; TH paper distresser; glue dots; 3M foam tape; Sizzix Texture Boutique; tweezers
Misc: scrap cardboard (cereal box)

Friday, September 16, 2011

Free Digi Friday: Vino Basket Fill

Chateau Grand Traverse
I'm wrapping up the fall-themed basket fill digis with today's free "Vino Basket Fill".  Michigan has quite a few wineries and is particularly known for its whites.  The nip of Autumn in the air this week brings to mind the harvest and the wonderful wine tasting tours available this time of year.  If you're looking for a great fall wine getaway, I suggest the wineries on Old Mission and Leelanau Peninsulas near Traverse City. 
 
**EDITED**
Friday Free Digis are free for one week. This digital stamp is now available for purchase. To order, go to the side bar, enter the stamp name shown below and click 'buy now' to pay via Pay Pal.

Cost: $2.00
Stamp Name: Vino Basket Fill
I will email you the file within 24 hours of receiving payment.

You can pick up the coordinating Basket SVG file and/or print-and-cut file from The Creative Pointe.  

Some of the leaves and grape bunches are designed to hang over the edge of the basket.  This will be a great digi/SVG combo to use to scrapbook that romantic wine weekend!  :-)

Next week I'll bring you a new fall-themed fall digi.  Please become a follower so you don't miss out!

Wednesday, September 14, 2011

Pumpkin Basket Bi-Fold Card

Have you downloaded the Pumpkin Basket Fill digi yet?  Oh, and don't forget its coordinating Basket SVG or print-and-cut files from The Creative Pointe!  Friday brings a whole new digi, so be sure to grab the Pumpkin Fill digi while it's free!

Sharing a bi-fold card tonight that I made using the Pumpkin and Basket combo.  I didn't want your "run of the mill" single fold card like usual, so I designed this one as a bi-fold card with a big cameo center.  It ties at the side in a simple bow so it's like unwrapping a little gift for the recipient.

A Few Details:
  • I printed the digi on two different orange-y autumn-type pattern papers, cut them out, and paper-pieced them so that the top and bottom pumpkins are the same and the center pumpkin is from a different pattern.
  • I used Distress Inks, Distress Stains, and an aqua pen to add shading to the pumpkins and color to the leaves and stem.
  • The basket was cut from pattern papers this time for some extra texture.  It too was shaded with Distress Ink and an aqua pen.
  • Here you see how the bi-fold opens:


Challenges:

Supplies:
Paper
: SU! cardstock ‘Really Rust’, ‘Going Gray’; K&Co.; misc. scrap pattern papers
Image: ‘Pumpkin Basket Fill’ digital stamp by Paper Squirrel
SVG:  ‘Basket’ SVG file by The Creative Pointe
Stamps: JoAnn
Inks: DI ‘Wild Honey’, ‘Vintage Photo’, ‘Forest Moss’; Distress Stain ‘Rusty Hinge’, ‘Crushed Olive’; StazOn ‘Timber Brown’; LePen ‘Brown’
Embellishments: fibers

Tools: scallop scissors; Martha Stewart score board; SCAL; Cricut Expression; Inkjet printer; aqua pen; Coluzzle; Krylon Workable Fixatif

Friday, September 9, 2011

Free Digi Friday: Pumpkin Basket Fill

Today's free digital stamp is a Pumpkin Basket Fill.  Remember, the basket fill digis are specifically designed to use with The Creative Pointe's "Basket" SVG file that you can still get for free.  (If you are not an SVG user, Cindy also has a print-and-cut basket file for you). 


**EDITED**
Friday Free Digis are free for one week. This digital stamp is now available for purchase. To order, go to the side bar, enter the stamp name shown below and click 'buy now' to pay via Pay Pal.

Cost: $2.00
Stamp Name: Pumpkin Basket Fill
I will email you the file within 24 hours of receiving payment.

Perfect for the entire Autumn season...Halloween, Thanksgiving, etc., this pumpkin stack is extremely versatile and I know that you all will come up with some creative uses for it.  I'll be playing around with it as well, and will post an example project in the upcoming week, so check back!

Layering these two files results in an adorable image!

Don't miss out on a single free digi...become a follower today!

Wednesday, September 7, 2011

Autumn Blessings Tag

Did you grab the "Apple Basket Fill" digi yet?  If not, you still have a little time left to get it for free...remember, Friday will bring a brand new free digi. 

I used the apples and basket combo to make this Autumn Blessings tag, layered up with reminders of Fall...crisp apples, primitive alphabet paper, ruler twill tape, twine. 

The Details:
  • I quickly and easily colored a manila tag with Distress Stains, applying Rusty Hinge horizontally and Pumice Stone vertically.
  • I layered up two pattern papers with their torn edges distressed using Old Paper DI and applied ruler twill tape along the bottom edge.
  • I border-punched two sides of a third pattern paper, crinkled, and distressed it and applied that vertically.
  • I printed the "Apple Basket Fill" digital stamp onto SU! So Saffron card stock and colored the apples using Distress Stains and Inks with an aqua pen.  Don't forget to spray your prints with a workable fixative (I use Krylon) before coloring so your ink will not bleed into your colors.  Also, be sure to spray outside or in a well ventilated area!
  • The basket was cut using my Cricut, SCAL, and The Creative Pointe's SVG file that you can get for free HERE.  I applied the basket to the tag using foam tape to make it pop.
  • The final touches were the stamped sentiment and a variety of buttons, twine, and ribbon.

I have a friend with an upcoming September birthday, so I think I'll use this tag to decorate a kraft gift bag for her.

Supplies:
Paper
: manila tag; K&Co; Daisy D’s; SU! cardstock ‘So Saffron’, ‘Going Gray’, ‘Close to Cocoa’; PTI cardstock ‘Kraft’; scrap pattern paper
Image: ‘Apple Basket Fill’ by Paper Squirrel
SVG:  ‘Basket’ by The Creative Pointe
Stamps: JoAnn
Inks: Distress Stain ‘Barn Door’, ‘Aged Mahogany’, ‘Rusty Hinge’, ‘Pumice Stone’, ‘Crushed Olive’; Distress Ink ‘Forest Moss’, ‘Old Paper’; Archival Ink ‘Coffee’
Embellishments: buttons; thread; PTI rustic button twine; TH safety pin; Ribbon Trends ruler twill tape; American Crafts grosgrain ribbon

Tools: EK Success border punch; aqua pen; 3M foam tape; TH paper distresser, foam ink blending tool; glue dots; SCAL; Cricut Expression; ink jet printer; Krylon ‘Workable Fixtatif’

Monday, September 5, 2011

Good-bye Summer!

I found this quote online and LOVE it!  It perfectly sums up the summer we've had here in Southeast Michigan.
"Summer is like the ultimate one-night stand..
hot as hell,
totally thrilling,
and gone before you know it."

It's Labor Day Weekend here in the States, which honors the working class and is our unofficial "end of summer".  :-(

To wrap up the season, I'm sharing a collage project that I completed in June and have had on display for most of the summer.  I had given you a sneak peek waaaay back, but here it is...finally!
(I know it's falling outside the lines, but you just couldn't see it very well otherwise...
Blogger needs a size option between Large and Extra Large!)
This Graphics 45 bathing beauty was my muse.  I knew that I wanted to feature her and red, white, and blue in the collage.  Everything else just fell into place...things that reminded me of great summers.  Swimming being one of them.  I love the water and can be an absolute fish!

"Summer" was cut using my Cricut and Sure-Cuts-A-Lot program.  I then embossed the letters with the Tim Holtz "Collage" Texture Fade and added layers of Distress Ink and Perfect Pearls mists until I achieved the depth and luster I desired.  Red, white, an blue are pretty much the colors of summer in the USA since we celebrate our Independence Day on July 4.  That's why I went after this color scheme...it just says "Summer"!  K&Co helped out quite a bit with some fun embellishments all from their "Americana" die cuts collection.

The flash card is from 7 Gypsies and the clock face is from Tim Holtz.  I'm not sure where I got the big mouth guy from, but thought he was the perfect addition.  A la a carnival emcee.

Another bathing beauty from Graphic 45.  A real bingo card from the dollar store (score!), some rhinestones and hand doodling for a touch of whimsy.  Also note that the star is surrounding the "4" on the bingo card in honor of July 4th.

Another bathing beauty, but this one from The Graphics Fairy.  Also some real ticket stubs from a scrapbooking event (but they could just as likely be from a county fair :-) ), more doodling and embellies.


Well, summer, that's a wrap. 
We will miss you...see you next year!

Challenges:

Friday, September 2, 2011

Free Digi Friday: Apple Basket Fill

The Sunflower Basket digi and SVG / printable collaboration between The Creative Pointe and Paper Squirrel was a hit!  And the good news is that I've got several more basket fill digis coming your way in next few weeks.  Your baskets will be overflowing with options!  You can still nab the Basket SVG and/or print-and-cut file for free at Cindy's blog. 

This week's free digital stamp is this "Apple Basket Fill".  Perfect for September...use for back-to-school projects, orchard or cider mill visit layouts, and cards!


**EDITED**
Friday Free Digis are free for one week. This digital stamp is now available for purchase. To order, go to the side bar, enter the stamp name shown below and click 'buy now' to pay via Pay Pal.

Cost: $2.00
Stamp Name: Apple Basket Fill
I will email you the file within 24 hours of receiving payment.

Just print and/or cut and layer!

As usual, I'll be featuring today's digi in a project in the coming week, so if you're not already, please become a follower so you don't miss it!