Saturday, July 30, 2011

Challenges Entry: Snowflake Ornament

All the "Christmas in July" talk out in blog land put me in the mood to create some Christmas projects of my own today.  This snowflake ornament is one of them and I'm submitting this to two challenges:


The Details:
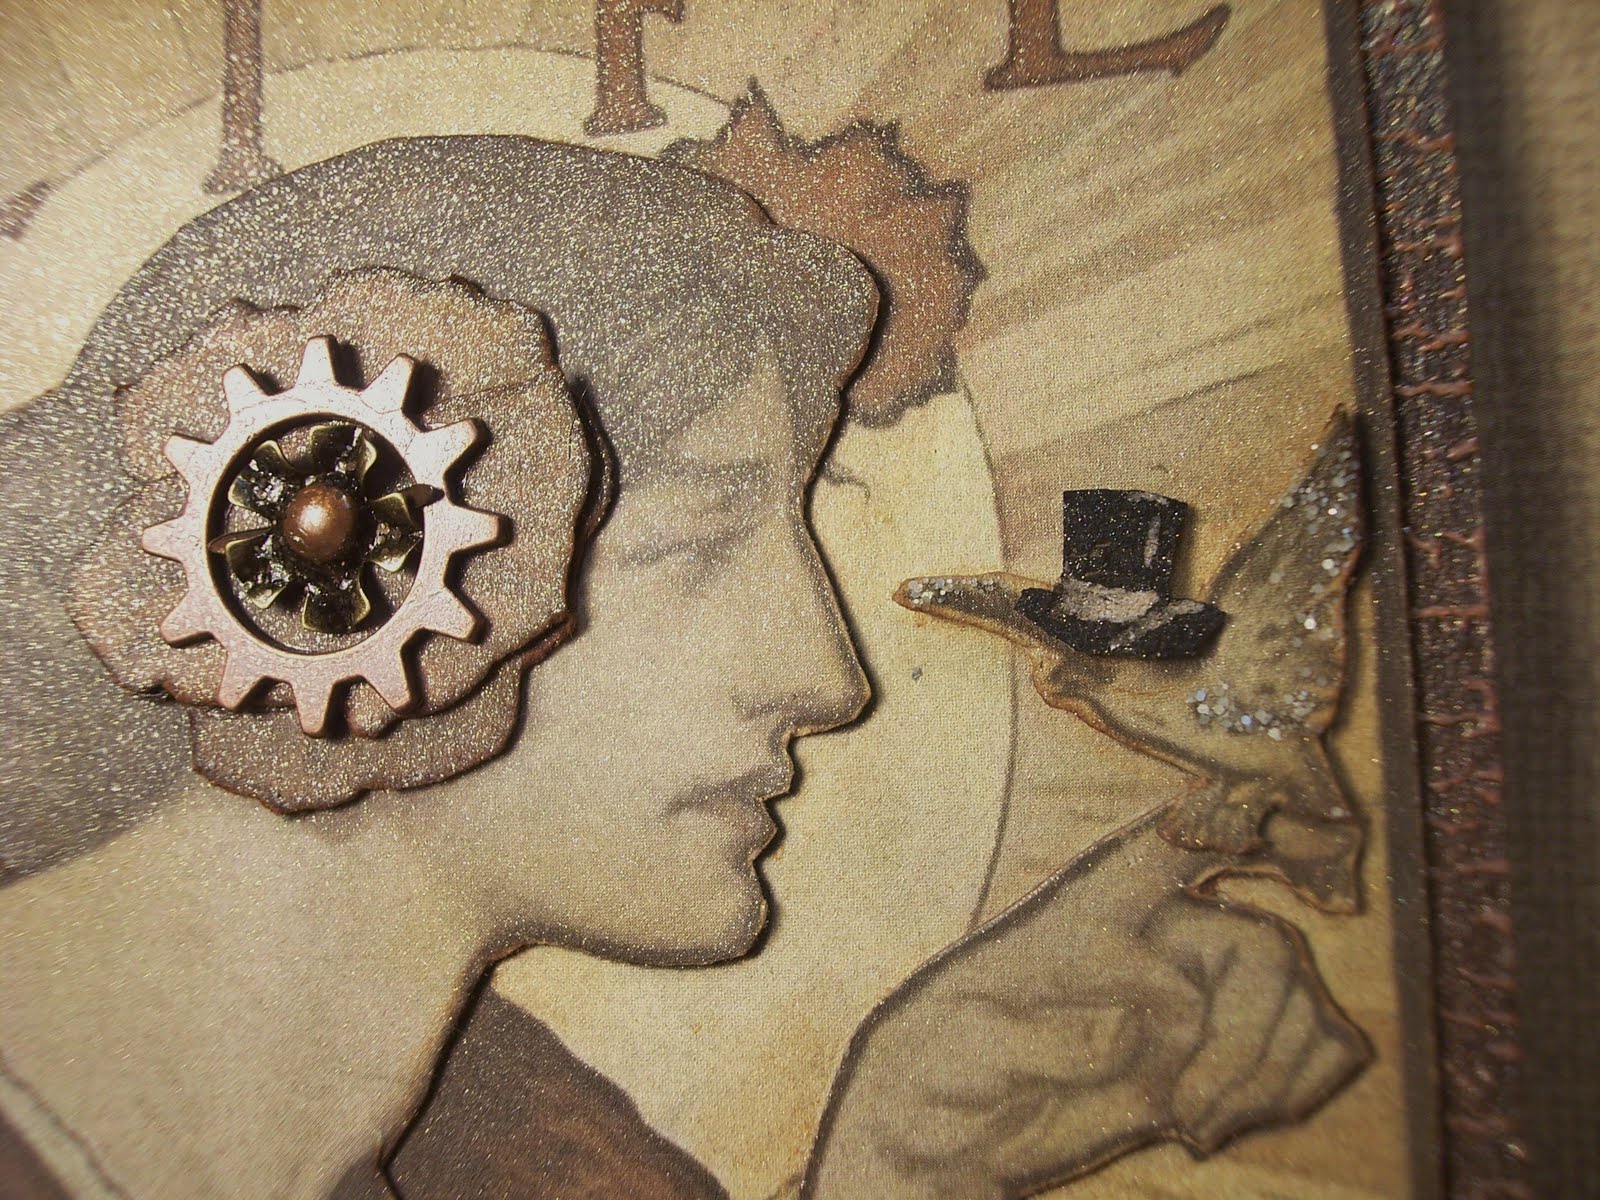
  • The base of the ornament is heavy cardboard covered in Basic Grey Figgy Pudding decorative paper, distressed with DI Forest Moss and Vintage Photo, and spritzed with Perfect Pearls Mist.
  • The image is from Crafty Secrets Heartwarming Vintage Cuts 'Winter Wonderland' and is covered in a layer of Tim Holtz Rock Candy Distress Paint.
  • I embossed a raw chipboard frame using the Tim Holtz Patchwork texture fade, then painted it with white acrylic paint.  I added layers of Distress inks and black antiquing gel before I was finally satisfied with the color and appearance.  Finally, I sprayed it with Perfect Pearls Mists in both Perfect Pearl and Heirloom Gold.

  • The snowflakes are my favorite part.  I dry-brushed white acrylic paint onto raw chipboard snowflakes, then covered them with Rock Candy Distress Paint.  While the paint was still wet, I added two sizes of crystal glitter.  Once the crackle had dried, I pounced on Old Paper and just a bit of Broken China DIs and finally, spritzed on a little Perfect Pearls Mist.


Supplies:
Paper
: Basic Grey Figgy Pudding ‘Balsam’
Image: Crafty Secrets Heartwarming Vintage Cuts ‘Winter Wonderland’
Inks: Folk Art acrylic paint ‘Wicker White’; TH Crackle Paint ‘Rock Candy’; Distress Inks ‘Forest Moss’, ‘Broken China’, ‘Peeled Paint’, ‘Old Paper’, ‘Vintage Photo’; Delta Black Antiquing Gel
Embellishments: Making Memories chip board snowflakes; JoAnn glitter ‘Crystal’; Martha Stewart fine glitter ‘Crystal’; chipboard frame; TH texture fade ‘Patchwork’; pearls; 7Gypsies ‘Princesca Hardware’; Perfect Pearls Mist ‘Perfect Pearls’, ‘Heirloom Gold’; Hug Snug seam binding; SU! silver cord

Tools: Texture Boutique; SU! eyelet tool set; heat gun; Glossy Accents
Misc: cardboard

Friday, July 29, 2011

Free Digi Friday: Ice Cream Cone

Happy Friday, everyone!
Today's free digital stamp is an ice cream cone with an optional extra scoop.  Whether you want a single scoop, double, triple...this digi will be super fun for paper piecing and you can keep piling on the scoops as high as you want to suit your project!


**EDITED**
Friday Free Digis are free for one week. This digital stamp is now available for purchase. To order, go to the side bar, enter the stamp name shown below and click 'buy now' to pay via Pay Pal.

Cost: $2.00
Stamp Name: Ice Cream Cone
I will email you the file within 24 hours of receiving payment.

Have fun...mmm...now I'm craving ice cream!

Wednesday, July 27, 2011

Sharing: Halloween Giveaway

I love Halloween, although I'm sad that we're all already starting to think about Halloween and Christmas projects.  Well...I haven't allowed myself to go there yet, but winning some new goodies would sure put me in the mood!  ;-)
 
Found out about this giveaway on Lynn Steven's "Trash to Treasure Art" blog and wanted to pass it along.  Alpha Stamps is having a big Halloween Giveaway Challenge.  In fact, they're actually giving away two prize packages!  Check out Alpha Stamps for the details on winning everything shown below.
 

P.S.  Just by spreading the word about this challenge on your blog, you can get the new Halloween Romance Collage sheet for free.

Tuesday, July 26, 2011

Birthday Cupcake Cards

My example project featuring last Friday's free Birthday Cupcake digi is actually a set of four versatile birthday cards.  You only need 3 sheets of 8.5 x 11 card stock and 4-5 pieces of scrap decorative paper (approx. 3x5) to make these very quick and simple cards.  Packaged together with envelopes and tied with ribbon, they will make a nice addition to a birthday gift basket for a friend!

The Details:
  • Select 4-5 scraps of decorative paper that all coordinate relatively well.  Don't get too hung up on matching, just make sure the colors work together and you have a variety of patterns.  Your scraps should be at least 3x5".
  • Print the Birthday Cupcake digi on each decorative paper scrap using the 3x5 paper size setting.  
  • Cut each cupcake into four parts:  the cake, the frosting, the candle, and the flame.
  • Rearrange your cupcakes so that you have one of each pattern in each cupcake.  I used 5 papers, so I had a few parts leftover, but this allowed me some flexibility in creating the best looking cupcakes.
  • The card bases shown are PTI Kraft 8.5 x 11" cardstock cut in half to form 4.25 x 5.5" cards. 
  • On top of the base, I layered PTI Aqua Mist cardstock, cut to 3.25 x 5".  I rounded the corners with my Fiskars punch.
  • Stamp your greeting in the lower right of the Aqua Mist CS, then glue your cupcake layers above.  I drew a wick with a Sharpie between the top of the candle and the bottom of the flame.
  • Add some ribbon and PTI rustic twine to the left side.
  • Finally, decorate your cupcake with some Stickles...and done!
So simple, but so cute!


Supplies:
Paper
: PTI cardstock ‘Kraft’, ‘Aqua Mist’; scrap background paper
Image: Birthday Cupcake digital stamp by Paper Squirrel
Stamps: SU! ‘It’s Your Birthday’
Inks: StazOn ‘Jet Black’
Embellishments: Stickles ‘Orange Peel’, ‘Crystal’, ‘Fruit Punch’, ‘Starry Night’; ribbon; PTI rustic button twine

Tools: Fiskars corner rounder punch; ink jet printer

Sunday, July 24, 2011

Challenges Entry: Life

Dearly beloved,
We are gathered here today
To get through this thing called LIFE.
- Prince

A little musical introduction for a piece I'm calling "Life".  Entering this into three challenges out there in blog land:

The Details:
Where to begin?  I'll try to hit just the highlights and not bore you!
  • I started with a thick piece of cardboard, painted it with copper acrylic paint (just rubbed it on with a make-up sponge), then I used clear embossing powder with a crackle background stamp.  Once the embossing was cool, I rubbed black antiquing gel over the entire surface, waited for it to dry and used a paper towel to remove the gel from the clear embossed areas.  I then sprayed the whole surface with Heirloom Gold Perfect Pearls Mist, with a heavier application to the corners.

The embossed crackle background.
  • The Life image is pieced in four layers.  Each layer was adhered to scrap cardboard (cereal boxes).  The base layer is the whole image.  Second layer is just the woman and bird.  Third layer is the biggest flower in her hair, the bird, and her lower hand and wrap.  Fourth layer is the smaller part of the flower in her hair.  The edges of each layer were colored with Old Paper and Vintage Photo DI before being glued down.
  • To steam punk things up, I made a little top hat for our bird friend out of Grunge Paper.  It is colored with StazOn Jet Black, then the band and highlights were created using a white gel pen.  I then sprayed it in gold PP mist and antiqued it with Vintage Photo DI. 
Here you can see the built-up layers. 
The poppy in her hair is embellished with a TH gear, metal foliage, and some Walnut Stain Distress Stickles.
In addition to the Grunge Paper top hat, the bird is embellished with Old Paper Distress Stickles 
  • The clock face is also made from Grunge Paper.  I used several layers of paint (Cornsilk Yellow, Metallic Gold, Metallic Copper, Black Antiquing Gel) to create a semi-metallic face, then distressed it with Vintage Photo DI and Walnut Stain Distress Stickles.  I used Glossy Accents to give the hands dimension.

  • The rest was layering up the gears and charms, adding the sentiment, adding touches of Distress Stickles and Glossy Accents, and then a final layer of PP Heirloom Gold mist.


Supplies:
Paper
: TH Grunge Paper, scrap background paper
Stamps: SU! Crackle background; TH ‘Life’s Possibilities’
Inks: Top Boss embossing ink; DI ‘Vintage Photo’, ‘Old Paper’; StazOn ‘Jet Black’; Glaze pen ‘white’; Folk Art acrylic ‘666 Metallic Antique Copper’, ‘660 Metallic Pure Gold’; Delta ‘Black Antiquing Gel’; Delta acrylic paint ‘Cornsilk Yellow’
Embellishments: clear embossing powder; Perfect Pearls Mist ‘Heirloom Gold’; Glossy Accents; Distress Stickles ‘Walnut Stain’, ‘Old Paper’; TH corners; TH swivel clasp; TH mini paper clip; K&Co. keys metal art; TH foliage; glass beads; TH gears; brads; TH jump rings

Tools: heat gun; make-up sponge; embossing powder tray; foam ink blending tool; TH paper distresser; emery board; hammer; foam tape; glue dots; needle nose pliers; hole punch
Misc: cardboard

And the Winner is...

#29 Beverly Gotthardt!

Congratulations, Beverly, you've won the 100 Follower Blog Candy!  Please email me (see side bar) your address and I'll get your goodies out in the mail.  For those of you not familiar with Beverly's work, check out her blog, Gott Heart Art...she does some really lovely things.


Friday, July 22, 2011

Free Digi Friday: Birthday Cupcake

Happy Friday!  Today's free digital stamp is this Birthday Cupcake.  This is a good one for both paper piecing and coloring.  I'll have a project featuring this digi in the coming week...can't wait to play with this one. 

**EDITED**
Friday Free Digis are free for one week. This digital stamp is now available for purchase. To order, go to the side bar, enter the stamp name shown below and click 'buy now' to pay via Pay Pal.

Cost: $2.00
Stamp Name: Birthday Cupcake
I will email you the file within 24 hours of receiving payment.


Also, don't forget to sign up for BLOG CANDY!  Saturday is the last day to enter.

Wednesday, July 20, 2011

Thinking of You Teacup Card

Today I'm sharing a card featuring last Friday's free Teacup digital stamp.  If you haven't already, be sure to snag it while it's free!

The Details:
  • I printed the teacup onto floral paper and used a variety of items to give it depth and interest.  For basic shading, I used watercolor pencils and an aqua pen.  For highlights, I used a white gel pen.  I then covered just the "outside" of the cup with Crackle Accents.  Once the crackle dried, I used Vintage Photo DI and an aqua pen to distress the cracks and deepen the shading.
    • Beware that Crackle Accents may change and/or bleed the color when used on decorative papers.  The roses on the front of the cup started out pink...now they're a coral color.  Not a big deal here, but on certain projects, that might make a difference!
  • The "steam" rising from the cup was created with watercolor pencils, a little Vintage Photo DI, and an aqua pen.
  • To create the doily under the teacup, I used a paper doily as a mask and pounced on Vintage Photo DI with a foam ink blender.  The edge of the doily is just a freehand scallop in white gel pen.
  • 
  • The flourish is another great SVG file from The Creative Pointe.  It's part of the Fancy Flourishes Two set.  SVG files are scalable, so it was easy to get just the right size flourish for my card.  I cut it from a scrap of decorative paper, then embellished it with watercolor pencils, aqua pen, and white gel pen.
  •  Fancy Flourishes Two contains three very versatile border flourishes and may be purchased from Diecut Designer or TKO Scraps.
    Fancy Flourishes Two Set by The Creative Pointe
    
Supplies:
Paper: PTI cardstock ‘Kraft’; K&Co; scrap background paper
Image: ‘Teacup’ digital stamp by Paper Squirrel
SVG:  ‘Fancy Flourishes Two’ by The Creative Pointe
Stamps: SU! ‘Warmest Regards’
Inks: StazOn ‘Timber Brown’; DI ‘Vintage Photo’; SU! watercolor pencils; Glaze pen ‘White’
Embellishments: Crackle Accents; scallop scissors
Tools: aqua pen; foam ink blending tool; paper doily; Sure-Cuts-A-Lot (SCAL); Cricut Expression; ink jet printer

Tuesday, July 19, 2011

Challenge Entry: Handle With Care Tag

Since June had five Wednesdays, Gingersnap Creations featured a Blue Moon Challenge.  Here's my entry for GCSP08:  Recipe - 3 Words, 3 Papers, 3 Buttons.  This was my first recipe challenge and I enjoyed it very much.  I will have to participate in more like this...it's a good way to refresh your creative spirit.
  
The Details:
  • I started with the three words, since those would really dictate the rest of the tag.  I recently snagged the 7 Gypsies "Disclaimer" stamp set from Crafty Steals.  It is a HUGE set full of great phrases that will be particularly good for scrapbooking.  When I saw the "Handle With Care", I immediately thought of a heart.  You should always handle someone's heart with care...literally and figuratively!  :-)
  • The three papers limitation was a struggle at first, but then I realized that I would just have to use them more than once.
  • I don't know why that teal button always photographs as blue!  Really, it's teal and it matches, I swear!

  • I layered the hearts and popped the red one up with some foam tape.  For added dimension and sparkle, I edged the red heart in Black Diamond Stickles.
  • The wings were stamped in SU! Going Gray and accented with Crystal Stickles
  • The crown above the heart and the border below the wording were stamped in Encore Ultimate Metallic gold and silver.  I inked the whole image in silver and then touched the edges with gold for a tarnished silver color.  The crown is accented with Gold Stickles and the border with Black Diamond Stickles.

Don't forget to enter to win some blog candy before Saturday.


Supplies:
Paper
: DCWV; K&Co.
Stamps: My Mind’s Eye Market Street ‘Adore’; Chatterbox ‘Eclectique’; 7 Gypsies ‘Disclaimer’
Inks: DI ‘Old Paper’, ‘Barn Door’, ‘Broken China’; StazOn ‘Jet Black’; SU! Craft ‘Real Red’; SU! Classic ‘Going Gray’; Encore Ultimate Metallic 'Gold', 'Silver'
Embellishments: clear embossing powder; Fiskars deckle scissors; Stickles ‘Crystal’, ‘Black Diamond’; buttons; SU! silver cord; black & white gingham ribbons; fibers; Celebrate It ribbon; SU! metal pieces

Tools: eyelet setting tools; heat gun; foam ink blending tool; embossing powder tray; foam tape; glue dots; TH paper distresser

Monday, July 18, 2011

Blog Candy! 100 Follower Celebration

Woo-hoo!  
My 100th Follower joined today and to celebrate and say thank you, I'm offering up a little blog candy giveaway.  
Manila Tags
Vellum Expressions
Word Button Stickers
Journal Tags
Assorted Novelty Buttons

TO WIN:  Be a follower of Paper Squirrel and leave a comment on this post by 11:59 pm EDT on Saturday, July 23.  I will post the random winner's name on Sunday.

A great big THANK YOU to all my followers!  I appreciate your kind comments and support of my art.

Good luck to all!

Sunday, July 17, 2011

Challenges Entry: Just Lovely Tag

I was finally able to sit down and work on some challenges today. Since today's the last day for both, I've combined Studio L3's Grungy Monday 15 and Simon Says Stamp & Show Some Stitching.

The Details:
  • I adore the Tim Holtz technique that Linda selected for this week's GM challenge. It's super easy and creates just the coolest background! Tim called it rust, but I went for a rich copper patina with mine. The base color is Broken China, top color is Crushed Olive (two of my favs). I also used Vintage Photo on the edges.
  • The lovely lady is cut from Graphic 45 "Bathing Beauties" paper. I cut her out with deckle edge scissors, then distressed the edges even more with the TH paper distresser and more Vintage Photo. For some sparkle, I added Frayed Burlap Distress Stickles to the border and Tattered Rose to the flowers in her hair.

  • The background paper is a K&Co Studio 112 tag run horizontally. I used Tim's multi-color inking technique to stamp the chandelier, then stamped "Just Lovely" in StazOn Timber Brown.
  • The yummy green trim is from Webster's Pages. I accented it with Lime Green and Walnut Stain Stickles.
  • The faux stitching was done with a brown Le Pen. I wanted it to look like the tag was sewn on with simple "X" basting stitches.


Supplies:
Paper: manila tag; Graphic 45 ‘Bathing Beauties’; K&Co Studio 112 ‘McKenna’ tag
Stamps: My Mind’s Eye Market Street ‘Adore’
Inks: DI ‘Broken China’, ‘Crushed Olive’, ‘Vintage Photo’; Le Pen ‘Brown’
Embellishments: Distress Stickles ‘Frayed Burlap’, ‘Tattered Rose’, ‘Walnut Stain’; Stickles ‘Lime Green’; Fiskars deckle scissors; Want 2 Scrap pearls; Prima flower; Celebrate It ribbons; Recollections brad; Webster’s Pages trim; clear embossing powder
Tools: foam ink blending tool; TH paper distresser; glue dots; ruler; heat gun; embossing powder tray

Saturday, July 16, 2011

Street Fair Finds

Every year I look forward to the Wyandotte Street Art Fair.  It's on the small side...just big enough to not be exhausting...but is in lovely downtown Wyandotte, Michigan and features great art booths, yummy fair food, and entertainment.  I snagged a couple items today.  I'm always drawn to the jewelry vendors and today I found a simple sterling silver ring that will become a wardrobe staple.

I also had my eye out for some pottery...specifically an Ikebana vase.  I coveted my sister's vase the last time I was at her house and while I didn't find one quite like hers (still want one like that), I found this pretty one from Stone Fence Pottery.  Loved that booth...not sure if it was because of the gorgeous pottery or the hunky young German master potter.  :-) 


While it was HOT, it was a lovely day at the art fair!  Hope you're enjoy the treats and festivities of summer as well.

Friday, July 15, 2011

Free Digi Friday: Teacup

Like most Fridays in the summer, it seemed like 5 o'clock would never come!  But now, it's officially the weekend...YAY!!

Today's free digital stamp is a Teacup.  Lots of great uses for this one.  Have fun creating!

**EDITED**
Friday Free Digis are free for one week. This digital stamp is now available for purchase. To order, go to the side bar, enter the stamp name shown below and click 'buy now' to pay via Pay Pal.

Cost: $2.00
Stamp Name: Teacup
I will email you the file within 24 hours of receiving payment.

Thursday, July 14, 2011

Congratulations Toast Tag

Only one more day to grab the Champagne digi while it's free!  This tag uses two champagne images to show a toast...I think it will be a good one to use on a wedding or anniversary gift.

The Details:
  • I started with a manila tag, embossed it using the Tim Holtz Regal Flourishes texture fade, and colored it with mostly Wild Honey DI.  I also used touches of Tattered Rose and Old Paper DI.
  • I layered a K&Co tag on top of the manila tag, aligning the holes.  I stamped 'Congratulations' in StazOn Timber Brown and embellished with lace and pearls.
  • I printed two champagne glasses, colored them with watercolor pencils, cut them out, and layered them on the tag as if they were being "clinked" for a toast. 
  • To highlight the bubbles, I added dots with white gel pen.
  • The champagne glasses also got a layer of Glossy accents to make them look more like glass.
  • I then sprayed the whole tag with Gold and Pearl Perfect Pearls Mists.


I love the summery colors and the shimmer!  So romantic looking.


Supplies:
Paper
: manila tag; K&Co. Studio 112 ‘Ornate’ tag
Image: Champagne digital stamp by Paper Squirrel
Stamps: SU! ‘Warmest Regards’
Inks: StazOn ‘Timber Brown’; DI ‘Old Paper’, ‘Wild Honey’, ‘Tattered Rose’; Glaze pen ‘White’; SU! watercolor pencils
Embellishments: lace ribbon; pearls; Darice flower; Martha Stewart crystal fine glitter; Perfect Pearls Mist ‘Perfect Pearl’, ‘Heirloom Gold’; Glossy Accents; ribbon; TH texture fade ‘Regal Flourishes’

Tools: tweezers; foam ink blending tool; glue dots; glue; Texture Boutique; glitter tray

Wednesday, July 13, 2011

Thank You Altered Pages!

Received a lovely surprise in the mail today!  Last week at the Gingersnap Creations blog, I was the randomly drawn winner of some goodies from Altered Pages and today I received my prizes. 

I can't tell you how excited I am about the Glitter Clean-up Cloth.  Not to be crude, but my sister, Cindy, likes to say that "glitter is the herpes of the craft world"...you can never get rid of it!  ;-)  I think UTEE is right up there.  Maybe it's just me, but that stuff seems to just get blown and flung everywhere!

Oh, and I was just trying to scrape the gunk off my scissors and tweezer tips, so the Klean All wipes are very timely!

Thanks again to Altered Pages for sponsoring the June challenges at Gingersnap Creations...and thanks for these goodies, they will be put to good use!!

Tuesday, July 12, 2011

Challenge Entry: Automobile Club

Don't you just love looking at store-bought cards featuring vintage photos with funny sayings?  (Not purchasing, just looking!)  I'm trying my hand at anachronistic humor with this "Automobile Club" piece.  I practiced my steampunk some more and I feel like I'm getting there!  I'm throwing this one in the ring for Gingersnap Creations GC 109:  Chestnut Theme Challenge - On the Road.

Imagine our otherwise very proper Tim Holtz gents speaking in their British accents but using American surfer phrases like "Bummer, dude"!  I was chuckling to myself the whole time while making this...yes, sadly, I find myself to be quite hilarious.  ;-)

A Couple Details:
  • Our gentleman driving the early automobile that appears to have been left in a bad neighborhood for the night, is from the ever fabulous Graphics Fairy.  He's printed on kraft cardstock and minimally embellished with metal pieces...I didn't want too much since the auto is supposed to be stripped down.  I also used colored pencils to pop him out of the background just a tad.
  • The three gents are stamped in StazOn Jet Black.  Their comments were printed on white cardstock.  The speech bubble was then stamped around the printed text, trimmed to fit, and distressed with Old Paper DI.


Supplies:
Paper
: PTI cardstock ‘Kraft’; SU! cardstock ‘Not Quite Navy’, ‘Ultrasmooth White’; unknown background papers
Image: The Graphics Fairy ‘Man with Motor Car’
Stamps: Stamper’s Anonymous TH ‘Curious Possibility’; Chatterbox ‘Eclectique’
Inks: StazOn ‘Jet Black’; DI ‘Old Paper’
Embellishments: SU! watercolor pencils; photo corners; TH tissue tape ‘Symphony’; Recollections brads; TH sprocket gears

Tools: TH paper distresser; 3M Super77 spray adhesive; glue dots; tweezers; foam tape; foam ink blending tool; glossy accents; wire cutters (to snip the backs off the brads)
Misc: cardboard

Monday, July 11, 2011

Flying Machine

Practicing my steampunk with this “Flying Machine” piece.  July’s theme at Gingersnap Creations is Steampunk, but since I’ve never made anything in this style before, I thought I’d practice a bit before submitting anything for the challenges.  I still have some work to do on really "getting" the style…I’m not quite steampunky enough yet!  But, I still like it!

The Details:
  • I started out with a piece of scrap cardboard, covered it in map background paper, layered on the sheet music for “Come, Josephine in My Flying Machine”, then stamped the hot air balloon over the top of the music in StazOn.
  • I embellished the Victorian lady’s fab-o hat with a metal trinket, flower, and enamel brad.  She’s from The Graphics Fairy.
  • I hand wrote part of the song verse on a K&Co tag, added a Tim Holtz adage ticket and crushed velvet ribbon with a metal “buckle”.  To make the ribbon look more like a belt or strap, I added Walnut Stain Distress Stickles as “holes”.

Linking up to Brag Monday at The Graphics Fairy!


Supplies:
Paper
: K&Co; Ampad; unknown
Image: The Graphics Fairy 'Ladies Hats'
Stamps: The Rubbermocker Stamp Co.
Inks: StazOn ‘Jet Black’; DI ‘Old Paper’, ‘Vintage Photo’; SU! chalk pastels
Embellishments: crushed velvet ribbon; TH tissue tape ‘Symphony’; TH adage tag; Distress Stickles ‘Walnut Stain’; K&Co Trinket Tag; SU! metal pieces; enamel brad; Darice paper flower

Tools: TH paper distresser; foam ink blending tool; 3M Super77 spray adhesive; foam tape; glue dots; water pen
Misc: cardboard

Sunday, July 10, 2011

Challenge Entry: Destination Unknown Tag

Showing off my entry in this week's Simon Says Stamp & Show a Flourish challenge.  I love flourishes, so this one was really fun!
I came across this image of a lovely, albeit naughty looking, vintage showgirl  in my stash.  She looked so wistful, like she was wondering how she got where she was and where she was going...Destination Unknown.

The Details:
  • I pulled a scrap of bold, black and tan flourish paper from the stash and started layering.  Vellum to tone it down a touch and give me a place to stamp.  Tissue tape for interest.  Distress Inks to make it more vintage-y.
  • I stamped a flourish in gold and silver where the bottom of the vellum meets the background paper, but it blurred considerably when I applied the Distress Inks.  That was okay though, because I didn't really like it.  I wanted a big, bold flourish, so I covered a raw chipboard flourish in gold and silver metallic inks, a touch of Vintage Photo DI, and three layers of UTEE.  The gold and silver pigment lift and get captured in the UTEE creating a wonderful effect that looks like metal leaf.  To accent the flourish even more (much like our showgirl's outfit), I added smoky quartz rhinestones and dots of Old Paper and Frayed Burlap Distress Stickles.
  • I wanted some fringe on this tag...it was calling out for fringe!  Since I didn't have any fringe that would look right, I made my own out of wide organza ribbon.  I simply cut the ribbon into small strips leaving a solid border at the top to hold it all together.  I then added some Frayed Burlap Stickles to the fringes and at the edge of the tag for a little sparkle.
  • I also added some Old Paper Distress Stickles to her headdress and outfit.  Isn't it just gorgeous?!  The outfits and details in old photographs just amaze me.


Supplies:
Paper
: manila tag, scrap background paper, SU! vellum
Image: Image Compilation & Enhancement ‘The Lady’s Closet’
Stamps: 7 Gypsies ‘Travel’; Inque ‘Ornaments’
Inks: Encore Ultimate Metallic ‘Gold’, ‘Silver’; StazOn ‘Jet Black’; DI ‘Old Paper’, ‘Vintage Photo’
Embellishments: Ultra Thick Embossing Enamel (UTEE); rhinestones; TH tissue tape ‘Nostalgia’; Making Memories chipboard flourish; Distress Stickles ‘Old Paper’, ‘Frayed Burlap’; photo corners; ribbon

Tools: foam ink blending tool; embossing powder tray; tweezers; vellum tape

Saturday, July 9, 2011

Sharing: Pina Colada Card

Sending a shout out today to Mama Bear Stonich who made this lovely card from my Pina Colada digi.  I love the colors...so tropical!  You can visit her blog HERE


Have you created something using one of my digis?  Post a comment or send me an email with a link...I'd love to see it and maybe send you a shout out!

Friday, July 8, 2011

Free Digi Friday: Champagne

It's Friday again and time for a new free digital stamp!

"So raise your glass if you are wrong in all the right ways..."

I love Pink and I love that song. :-) Today's glass of Champagne will be a good staple for weddings, anniversaries, retirements, graduations, birthdays...pretty much any celebratory occasion!

**EDITED**
Friday Free Digis are free for one week. This digital stamp is now available for purchase. To order, go to the side bar, enter the stamp name shown below and click 'buy now' to pay via Pay Pal.

Cost: $2.00
Stamp Name: Champagne
I will email you the file within 24 hours of receiving payment.

I'll feature this glass of bubbly in a project sometime in the next week.  Please leave a comment with a link if you use it in one of your creations...I'd love to see it!

Thursday, July 7, 2011

Cheers! Card

Is it Thursday already?!  I figured I better get in gear and post a card featuring last Friday's Martini digital stamp since there's only one more day for you all to snag it while it's free. 

With this card, I wanted to show the versatility of digital images by creating my own martini background paper. 

The Details:
  • To create the background, I simply copied and pasted several martini images in three different sizes. I then arranged them randomly using the Paint program that I'm fairly certain comes standard with any PC.  Printed on colored cardstock and there you have it...custom background paper.
  • For the central image, I printed a single large martini on the same color cardstock as the background.  This martini I cut out and colored, then mounted to the background with foam tape for some dimension.


Supplies:
Paper
: PTI cardstock ‘Kraft’; SU! cardstock ‘Old Olive’, ‘Basic Black’
Image: ‘Martini’ digital stamp by Paper Squirrel
Stamps: K&Co Amy Butler ‘Lotus Greeting’
Inks: StazOn ‘Jet Black’; Martha Stewart craft markers; SU! chalk pastels
Tools: foam tape

Wednesday, July 6, 2011

Technique: Background Paper Refresh!

If you've been paper crafting for a while, you probably have several sheets and scraps of background paper that you just don't like anymore.  You know the ones...you bought them early on or got them as part of a package and the colors or patterns aren't your style anymore.  There is a way to refresh these and bring them back into favor with Tim Holtz texture fades and a variety of ink applications.

I dug in my stash and selected five papers that I usually avoid.  As you see, they're pretty dated:

And turned them into five that I want to use!

The Details:
  •  Cracked Lace
    • Embossed with 'Cracked' texture fade
    • Starting from center of "crack", applied Stormy Sky, Broken China, Peeled Paint, and Tattered Rose Distress Inks with a foam blending tool
    • Then, over the top of the colors, applied Tea Dye for depth and to blend everything together
    • What a pretty background this would be for a "grungy" wedding card...not so lacy anymore!
  •  Purple Ledger Page
    • Embossed with 'Collage' texture fade
    • Rubbed SU! Basic Black pad directly onto the paper in a variety of directions, trying to only hit the embossed areas.
    • I love how this one turned out...great for Halloween!

  • Regal Roses
    • Embossed with 'Regal Flourishes' texture fade
    • Vintage Photo DI applied all over with a foam ink blending tool, then additional layers of Vintage Photo applied in only one direction to add depth to the "bottom" of the flourishes
    • Crushed Olive DI also applied in one direction with a heavier application in random areas
    • Oh so subtle and romantic now and the pearls have virtually disappeared...what a great background for a vintage lady image!
  • Chic Checkerboard 
    • Embossed with 'Retro Circles' texture fade
    • Peeled Paint DI pounced on with a foam ink blending tool
    • Be sure to alternate the direction of the blending tool as you pounce so that if you do get a hard edge it is randomly placed
    • I bought this paper EONS ago to make Easter cards and still have this scrap left...I just keep avoiding it.  But look at it now!  All steampunky and grown up!

 Trellis Dot Matrix
  • Embossed with 'Dot Matrix' texture fade (backwards! oh well, I ran with it!)
  • Dragged Old Paper DI pad down the paper in one direction for a streaky effect
  • This one's my least favorite, but it is still a lot better than the original!

Here's a birthday card that I made for one of my brothers-in-law using this technique:

Okay, I know you all have papers you don't like anymore, so get embossing and inking!