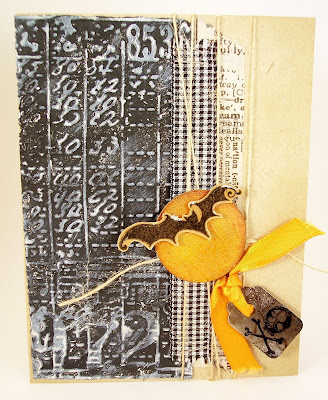
 I'm excited to announce that I'm part of a great design team for the new "Card A Day Blog". CADB features weekly themes, monthly challenges, and inspiration everyday! This week's theme is Cats & Bats and my card is today's feature card.
The Details:
- I've been seeing a lot of bloggers creating with foil tape lately and just HAD to run to the hardware store and get a roll of my own! (It's in the heating & cooling section...used for duct work).
- First, I embossed a section of foil tape using Tim Holtz's "Collage" texture fade. Next I sponged on black acrylic paint and once dry, used an emery board to scratch some paint off the high areas. I then took my Picket Fence Distress Stain and LIGHTLY dragged it across the high areas. Just enough to bring out the letters without covering up the black background.
- A bonus of foil tape is that it's self-adhesive. I adhered the finished foil background along the left edge of a Papertrey Ink Kraft card.
- To the right of the foil background, I layered random pieces of Tim Holtz tissue tape, then stapled a length of black & white gingham ribbon between these two layers and wound some Papertrey Ink baker's twine over that. (I love layers!)
- At this point, I distressed the edges of the card with Old Paper Distress Ink.
- The "moon" started life as a chipboard circle. I colored it with Distress Stains, then added a layer of Rock Candy Distress Crackle Paint, and finally shaded the edges with Distress Inks.
- The bat was stamped in StazOn Jet Black on the kraft side of a scrap piece of cardboard (cereal box) so it would have some thickness when cut out. I covered the bat in glossy accents and once dry, layered it using foam tape to "fly" across the moon.
- The metal tag started out as very shiny silver, but with the help of Mushroom Alcohol ink, StazOn Jet Black, and Picket Fence Distress Stain, it now looks corroded...perfect for a Halloween card! The skull and crossbones is stamped in StazOn Jet Black. Be sure to use a solvent ink like StazOn when stamping on non-porous surfaces. Water-based inks will bead up and smear. (Also be sure to clean your stamp immediately after using a solvent ink!) A snippet of orange ribbon and a glue dot holds the tag in place.
- Don't worry, I didn't forget about the cat...he's on the inside! A scrap of Stampin' Up! Pumpkin Pie cardstock and some black photo corners dress up the inside of this card. The cat is stamped in Champagne Versamark Dazzle so he sparkles just a little.
Supplies:
Paper: Papertrey Ink cardstock ‘Kraft’; Stampin’ Up! cardstock ‘Pumpkin Pie’
Stamps: Basic Grey ‘Spooky’; SU! ‘All Year Cheer’
Inks: Americana acrylic paint ‘Lamp Black’; Distress Stain ‘Spiced Marmalade’, ‘Rusty Hinge’, ‘Picket Fence’; Distress Ink ‘Old Paper’; StazOn ‘Jet Black’; Versamark Dazzle ‘Champagne’; Alcohol Ink ‘Mushroom’, ‘Blending Solution’
Embellishments: Glossy Accents; Distress Crackle Paint ‘Rock Candy’; PTI rustic button twine; Tim Holtz texture fade ‘Collage’; SU! chipboard circle; SU! metal tag; black & white gingham ribbon; staples; TH tissue tape ‘Symphony’; aluminum foil tape; satin ribbon; Canson photo corners
Tools: foam ink blending tool; stapler; TH paper distresser; glue dots; 3M foam tape; Sizzix Texture Boutique; tweezers
Misc: scrap cardboard (cereal box)


Great card!! I really love the embossed panel and the bat image. Thanks for the freebies ;) have a great day!!
ReplyDeleteGlad you finally got to use the foil tape. Great technique for it too.
ReplyDeleteYour card is amazing........I love it! Got to go and get me some of that foil tape I think....
ReplyDeleteThanks for a great card!!! I keep forgetting to pick up some of that tape. Love the embossing.
ReplyDeleteOh I got to get me some of this tape! Thanks Vicki for sharing this idea with us and the card is pretty nifty too.
ReplyDeleteI have the foil tape but have not used it for card making. Thanks for the tutorial and i'll have to give it a try.
ReplyDeletelove that foil tape. great card.
ReplyDeleteThis is adorable and yes, I loved your use of the metal tape.
ReplyDelete