Sunday, March 31, 2013

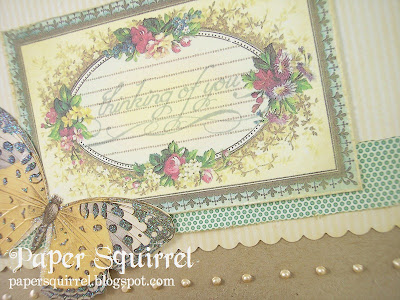
Thinking of You

Happy Easter
He is Risen, He is Risen, Indeed!

The theme this week at Card A Day Blog is "Thinking of You", and while this theme can cover a lot of things, unfortunately lately for me, it means sympathy cards.

I wanted something simple with a soft, comforting palette...

A Couple Details:
  • Kraft cardstock is so grounding...not too sweet, not too harsh.  Always the perfect base when you want to go simple.
  • The Crafty Secrets frame did most of the work for me, stamping "thinking of you" in the center and distressing the edges is the only extra work it needed from me.
  • A scalloped edge along the bottom edge of the patterned paper, a distressed strip of contrasting paper, and a butterfly sticker add detail, but not bulk.  This will go through the mail in great condition.
  • And for that something extra, a simple row of Liquid Pearls dots along the bottom.

Supplies:
Cardstock: Papertrey Ink ‘Kraft’
Patterned Paper:  My Mind’s Eye Lost & Found Two ‘Sunshine’ 6x6
Stamps: K&Co. Amy Butler ‘Lotus Greeting’
Inks: Memento ‘London Fog’; Distress Ink ‘Old Paper’
Embellishments: Crafty Secrets Creative Scraps; K&Co. embossed stickers Elizabeth Brownd ‘Traditional Butterflies’; Liquid Pearls ‘Bisque’
Tools:  Tim Holtz paper distresser; foam ink blender; scallop scissors

Tuesday, March 26, 2013

Welcome Spring!

It may not really feel like it yet here in Michigan, but spring is finally here!  To celebrate, I played with my acrylic paints again.

The Details:
  • The card base is pale yellow stock on which I randomly swiped three colors of paint (tomato, plum, and yellow ochre) in long strokes using a make-up sponge.
  • On top of the swipes, I stamped a crackled paint design in cream paint.
  • To that, I added some speckling in spice and ochre using an old paint brush.
  • And finally, a little Vintage Photo Distress Ink aged the edges just a tad.
  • A printed K&Co diecut was the inspiration piece for the background colors and is the perfect spring-y centerpiece for this card.
  • A strip of scalloped yellow gingham patterned paper breaks up the painted background just enough.
  • Of course I didn't have any ribbon to match my creation, so I once again dyed my own using acrylic paint and a little Distress Ink.
  • A fluffy white flower and tomato button are a nice soft touch.
  • And finally, the greeting was handwritten onto punched photo labels with a Wild Honey Distress Marker.  I used the leftover paint on the make-up sponge to lightly accent the edges.

Another Easter card finished!

Supplies:
Cardstock: Papertrey Ink ‘Lemon Tart’; Stampin’ Up! ‘Naturals Ivory’
Patterned Paper:  My Mind’s Eye Miss Caroline ‘Fiddlesticks’ 6x6
Stamps: SU! ‘Crackle’
Inks: Acrylic paint Delta Ceramcoat ‘Tomato Spice’, ‘Dusty Plum’, Americana ‘Yellow Ochre’, ‘Light Buttermilk’; Distress Ink ‘Vintage Photo’, ‘Milled Lavendar’; Distress Marker ‘Wild Honey’
Embellishments: K&Co. diecut ‘SW Spring Blossom Seed’; Darice flower; Close to My Heart button; PTI rustic button twine; Hug Snug seam binding ‘Ivory’
Tools:  Heat tool; mister; make-up sponge; foam ink blender; 3M foam tape; scallop edge scissors; glue dots; EK Success punch ‘Photo Labels’; toothbrush

Monday, March 18, 2013

CCC #12: Mr [heart] Mrs

I am so excited that our two-week theme at Creative Cutting Challenge is "Anything Goes"!  I got to check another wedding decor "to do" off my list with this Mr [heart] Mrs banner!  

I have seen several versions on Pinterest (the ultimate wedding idea website) and think it will be the perfect addition to the head table.  And because I used SVG and font files, it was a super-quick project.

The Details:
  • Using extra-heavy cardstock (100 lb), I cut five banners using The Creative Pointe's "Banner" SVG file.  I scaled them so that they are just over 5 inches square.
  • Using "Grad" font, I scaled my letters appropriately to fit the banners and then cut them from black stock.
  • The final cut was the pretty pink heart.  This cut file came standard with Sure-Cuts-A-Lot (SCAL).
  • With all the cuts made, it's time to layer the banners in an easy two steps:  1) adhere doily, 2) adhere letter.  Both were attached with spray adhesive.
  • To brighten things, I swiped watered-down white acrylic paint along the edges of the banners and the heart.  I also stamped the heart with a French script background in white pigment ink.  It added the necessary bit of white since I did not layer a doily on this banner.
  • Now to assemble.  Some lovely pink cording is strung through the corner hole punches.  The texture of the cording keeps the banners from sliding.

Like I said, this was one seriously easy and quick wedding project!  Thank goodness, because I have plenty in process that are not quick, nor easy.  I can't wait to see what the other designers create for their "Anything Goes" project.  Click here to check out all the Creative Cutting Challenge Design Team projects and join the challenge. Even if you don't use SVG files yet, it's definitely worth the visit for some great ideas!

Supplies:
Cardstock: Paper Presentation ‘Fog’; Stampin’ Up! ‘Basic Black’, unknown discontinued pink
SVG:  The Creative Pointe ‘Banner’; font ‘Grad’
Stamps: SU! ‘French Script’
Inks: Americana acrylic paint ‘Titanium (Snow) White’; SU! craft ‘White’
Embellishments: Paper doilies; Hobby Lobby trim ‘Strawberry Sherbet’
Tools:  SCAL; Cricut Expression; 3M spray adhesive; make-up sponge; hole punch

Sunday, March 10, 2013

Painted Easter

We're kicking off a week of Easter cards at Card A Day Blog and I've been playing with paint!

I admit, I love all things Tim, but with the wedding fast approaching, I'm really trying to rein in my craft spend.  So, while I keep seeing these wonderful blogland posts on the new Distress Paints, I just can't bring myself to purchase them when I have a whole rack of acrylic paints languishing in the studio!  And though I'm sure DPs are magical, I thought I'd see what I could do with those abandoned ordinary, non-Tim paints...

The Details:
  • That's right, I'm starting with the details before even showing you the end result...I'm building drama!  LOL!  Plus, I actually remembered to get the camera out while in the process of creating, not just at the end.
  • I've seen a lot of stamping and background work with DPs, so I decided that was a perfect way to start my paint experimentation.  I made my card base from spring moss stock, then added some "swoops" of yellow ochre using a make-up sponge (I love using make-up sponges for paint because they do a great job and are cheap enough that I just toss 'em when I'm done). 
  • Next layer was a postcard background stamped in buttermilk.  I also lightly swiped the edges and corners with buttermilk.
  • Paint gives the image such dimension and texture...I love it!
  • Final paint layer was some rouge fly-speckling using a toothbrush.  The more water you add to your paint, the larger the speckles will be.  Always test on a scrap before flicking onto your project.

  • Something I haven't seen DPs used for (yet) is coloring ribbon.  I didn't have the right shade of ribbon to match my card, so I decided to dye my own using yellow ochre acrylic paint and water.  It turned out lovely!    At first, it's really matte and heavy looking with the paint pigment.
  • But then, when you squeeze it in a paper towel, the distressed look comes through and you get highs and lows of color.  It has a softer, more chalk-pastel finish than when using ink pigment.  Perfect for spring...reminds me of the finish on an eggshell.
  • I had this perfect Easter image from K&Co. with a not-so Easter-y sentiment.  "You're invited"?  Seems like an odd choice on their part, but I can fix it!
  • I punched a photo label from cream cardstock and stamped "Easter" in Crushed Olive DI.  After tattering the edges with a Tim Holtz paper distresser, I used the same make-up sponge to add color to the edges.  It's subtle because I didn't re-apply any paint to the sponge, I just used what was already on it.  I then mounted the finished label over the unwanted sentiment using foam tape for dimension.

Okay, I think I've taunted you enough!  Here's the finished card.  I used just a touch of patterned paper behind the bunny and flowers image.  I'm really pleased with the background and am sure I'll continue my paint experiments.
Supplies:
Cardstock: Papertrey Ink ‘Spring Moss’; Stampin’ Up! ‘Naturals Ivory’
Patterned Paper:  Authentique ‘Blissful’ 6x6
Stamps: SU! ‘All Year Cheer’; Unity Ippity ‘Thoughts from the Past’
Inks: Acrylic paint Americana ‘Yellow Ochre’, ‘Buttermilk’, Delta Ceramcoat ‘Rouge’; Distress Ink ‘Crushed Olive’
Embellishments: K&Co diecut ‘SW Spring Blossom Seed’; Hug Snug seam binding ‘Ivory’
Tools:  Scallop edge scissors; Stamp-a-ma-jig; EK Success punch ‘Photo Labels’; 3M foam tape; mister; heat tool; Tim Holtz paper distresser; make-up sponge; toothbrush

Monday, March 4, 2013

CCC #11: Bunny Hop

Here we are in March already and Easter is sneaking up on us quickly!

Join us for our two-week "Easter Card" theme at Creative Cutting Challenge and get a head start on your Easter greetings.  Click here to check out the creative inspiration from our Design Team and join the challenge.  Even if you don't use SVG files yet, it's definitely worth the visit for some great ideas!

I created this pastel patchwork card with a fun leaping bunny silhouette as the focal point.

Some Details:
  • I knew going into this card that I wanted to use this adorable leaping bunny silhouette from The Creative Pointe's "Easter Bunny" SVG set.  
  • I cut him from white card stock, then sweetened him up with some Spun Sugar Distress Stain.  He needed some detail, so I used my white Glaze gel pen to add some stitch line details.  He's leaping across the patchwork background on some foam tape for dimension.
  • The first layer of my "patchwork" was the rectangles of patterned paper.  Then I added some white stamped polka dots and white gel pen doodling in the empty rectangles.
  • It still needed some love, so I added the washi tape banners, the stamped "Happy Easter", and a few pastel brads.

Supplies:
Cardstock:
Papertrey Ink ‘Lemon Tart’; Stampin’ Up! ‘Confetti White’
Patterned Paper: 
Jillibean Soup ‘Southern Chicken Dumpling Soup’ 6x6
SVG: 
The Creative Pointe ‘Easter Bunny Set’
Stamps:
SU! ‘Itty Bitty Backgrounds’, ‘All Year Cheer’
Inks:
SU! craft ‘White’, ‘Regal Rose’; Glaze pen ‘White’; Distress Stain ‘Spun Sugar’
Embellishments:
Washi tape; SU! brads ‘Soft Subtles’
Tools: 
SCAL; Cricut Expression; 3M foam tape; hole punch; Glossy Accents; Stamp-a-ma-jig